Disclosure: This post may contain affiliate links.
Simple can often be best and this recipe is a good example of just that. Made using just four ingredients, this is the perfect way to deal with a chicken breast when you feel like you might be lacking time, inspiration, energy, or all of the above but the end result is a moist, protein-packed chicken dish that not only stands on its own, but is bursting with enough flavor (thanks to a well-developed crust) to fool anyone into thinking that you went all out. But don’t worry, I won’t tell, the ease and simplicity of this dish will be our secret! 🤫😉
💕 Here’s Why You’ll Love This Recipe:
- It’s perfect for busy weeknights
- It goes well with pretty much any side dish from veggies to pasta to rice.
- It uses minimal ingredients (just 4!)
- It’s easy to prepare and relatively hands off
- It’s flavorful and delicious
- It’s essentially the perfect blank canvas that can be enjoyed on its own or “dressed up” by adding anything from butter to your favorite herbs and spices.
Here’s What You Need to Make This Simple Dish:
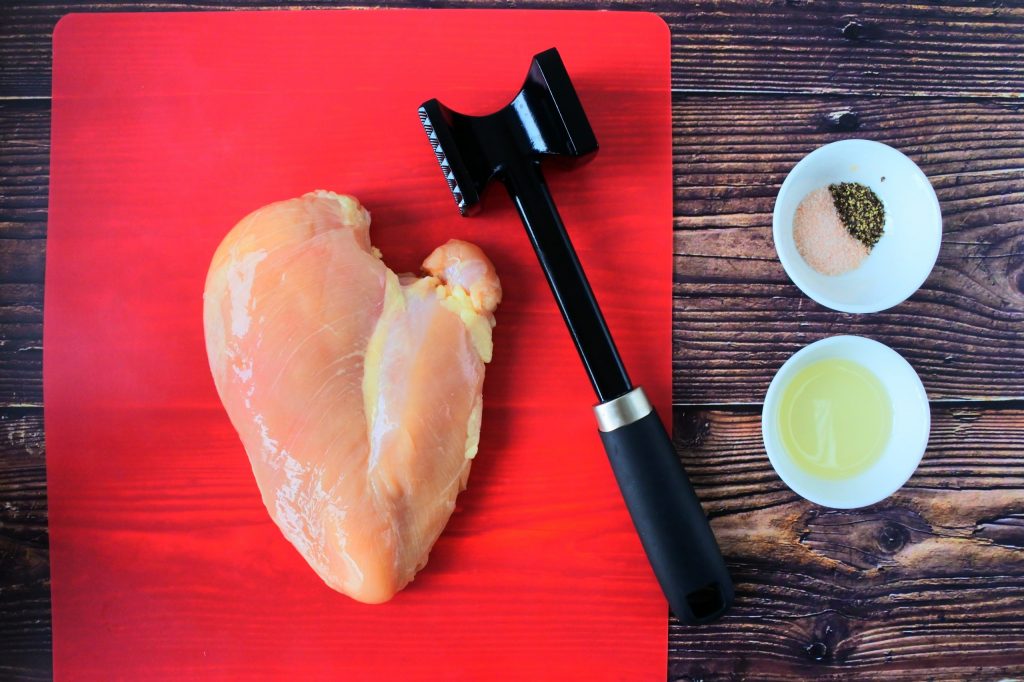
- Chicken Breast: Boneless and skinless is what I’m using today but you can also use bone-in, skin-on chicken breasts or even chicken thighs.
- Extra Light Olive Oil: Or any neutral tasting clean-eating oil of your choosing. You can also use ghee for great flavor as well!
- Salt: I’m using a pink Himalayan salt but you can also use a sea salt.
- Pepper: Fresh cracked or pre-ground, the choice is yours.
Seriously, that’s it. To say that this dish is “chicken-forward” is an understatement. We’re all about the chicken here, we’re embracing it, we’re celebrating it, we’re making it a star…that is of course after we pound the crap out of it…no, really, see that meat mallet in the above image? We’re going to be making use of that in just a moment. But before we get to that here’s a few tips to keep in mind that will ensure seared chicken perfection!
Tips and Tricks to Guarantee a Perfect Pan-Seared Chicken:
- Flatten your chicken to tenderize it and ensure even thickness for even cooking.
- Pat your chicken breast dry using paper towels.
- Use a cast iron skillet if you can.
- If you’re using chicken with the skin on, sear it with the skin side down first.
- Once you add your chicken to the hot, oiled pan do not touch or move it until it releases itself from the pan. This can take anywhere from 5-10 minutes per side.
- Remember that the thinner the chicken, the faster the cook time.
- Once cooked to an internal temperature of 165F, remove your chicken from the heat, loosely tent it with foil, and allow it to rest before cutting.
- And finally, always slice your meat against the grain.
I’ll go into more detail with each of the above points throughout the post.
Let’s Get to It!
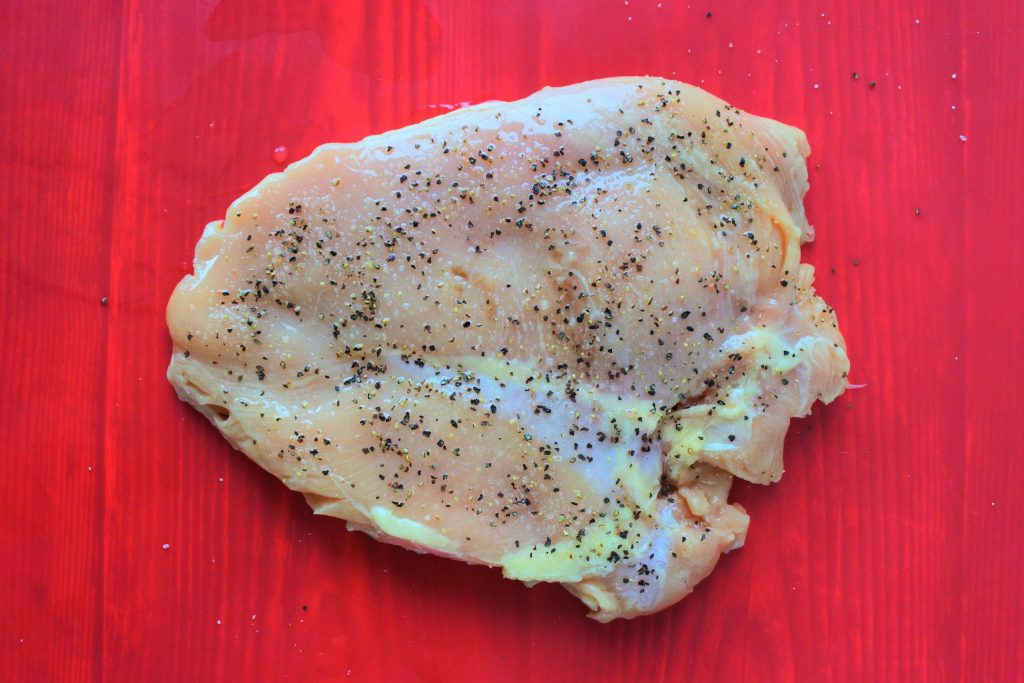
To start, we’ll pound our chicken flat using a meat mallet, rolling pin or the bottom of an empty wine bottle. This will ensure a few things: first your chicken will be tenderized. Second, it will have a consistent thickness which allows for even cooking (There’s nothing worse than having one end of your chicken be raw while the other is dry and overcooked). And finally, it creates more surface area which means more area for crust and flavor to develop!
Note: if using a bone-in piece of chicken, skip the flattening and pounding step.
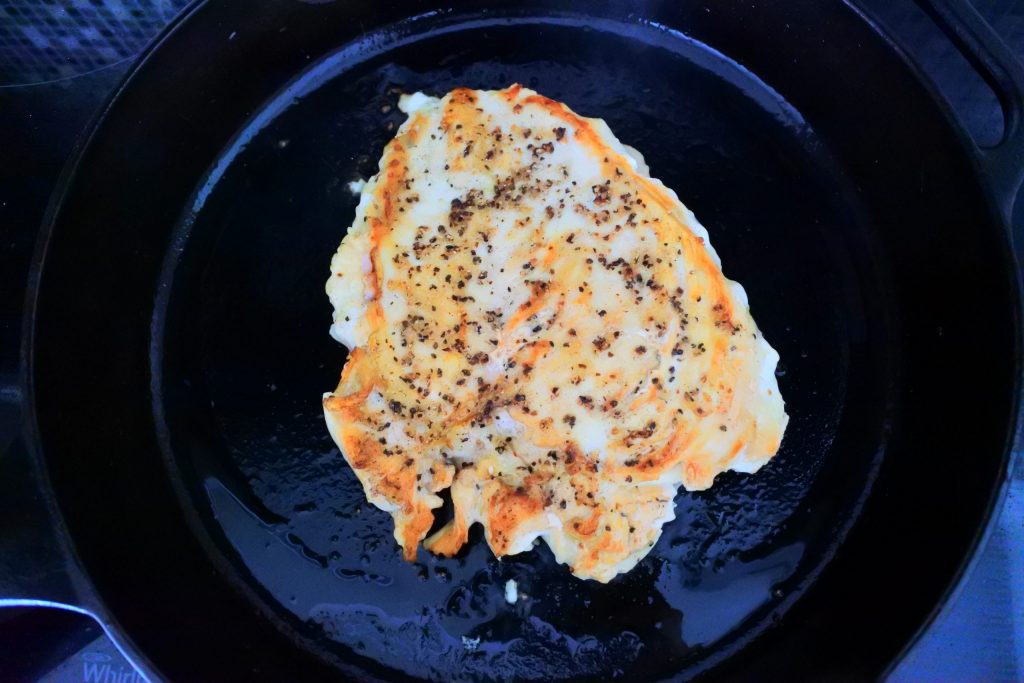
After flattening your chicken breast, be sure to use a paper towel to pat it dry before you season it liberally with salt and pepper. Note that salt draws moisture out of things. In the time it took me to season and take the image my chicken breast needed to be patted dry once more so if you season your chicken and leave it for even a minute you might need to pat it dry once more. This really is a crucial step to having that crust develop via the maillard reaction.
If your chicken is wet or has moisture on its surface you will not get that browning that you want, instead your chicken will steam once it makes contact with the oiled pan and be white.
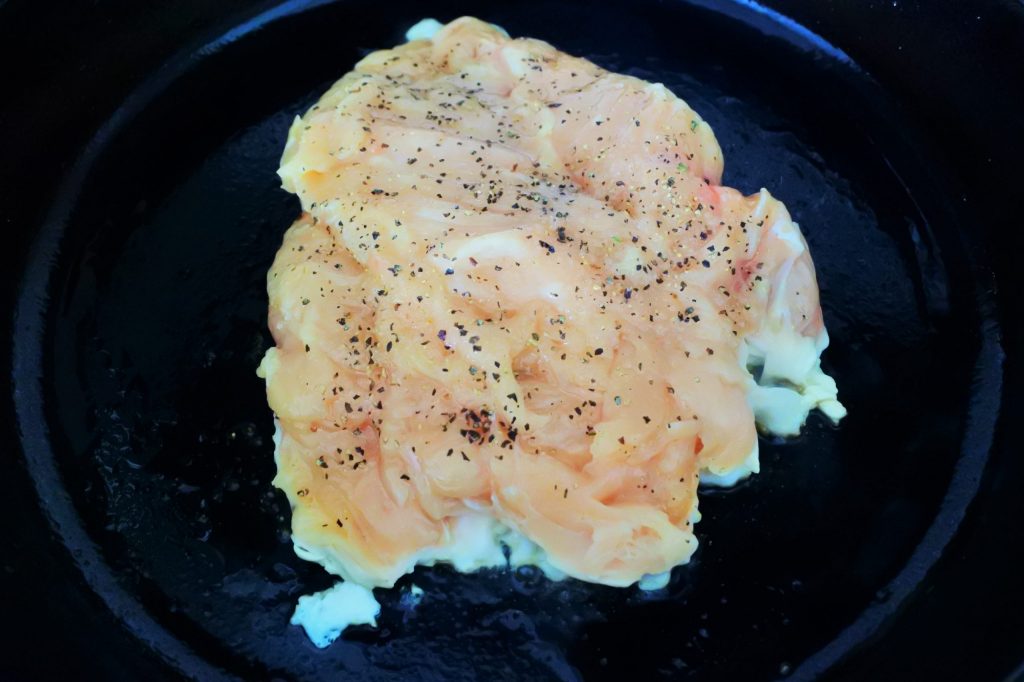
Speaking of pans…opt for using a cast iron skillet. Enough said, right? Now, is it essential? No, it’s not. But if you happen to own one don’t hesitate to use it, you’ll thank me later.
Also, note that if you’re using a chicken with the skin on, be sure to place it skin side down first. Your pan will be well oiled, clean, and at its hottest (and it should be hot!) which will allow that skin to crisp right up. It will be out-of-this-world delicious! The reason you don’t want to sear the skin side second, is because you run the risk of you not getting that wonderful crispness because your pan will by that point not be as hot, or as oiled as it will have some of the chicken’s juices mixed in with the oil. It won’t be the same.
Now, I know this one will sound weird, but you need to let the chicken tell you when it’s ready to be flipped. The moment your chicken touches your hot, oiled pan it’s going to stick to it. Do not, I repeat, DO NOT touch it or try to move it around. Let it sit undisturbed and sear off. It might take you longer than 5 minutes (5-10 minutes is usually the range depending on how thick your chicken is), but once your chicken is ready to be flipped (aka when the crust has fully developed) it will let go of the pan itself and you’ll be able to effortlessly turn it over. If it’s sticking, it’s not ready. Give it a minute or two more and then, using a flat, preferably metal, spatula, gently try again. If you rip it free of the pan you’re destroying your crust and less crust = less flavor.
Are you still with me? We’re on the home stretch, so here’s a bonus tip!
Want to be extra decadent? Add a tablespoon of butter and throw in some herbs into your pan, once melted and the herbs are fragrant, spoon your herb butter over your chicken, basting it a few times.
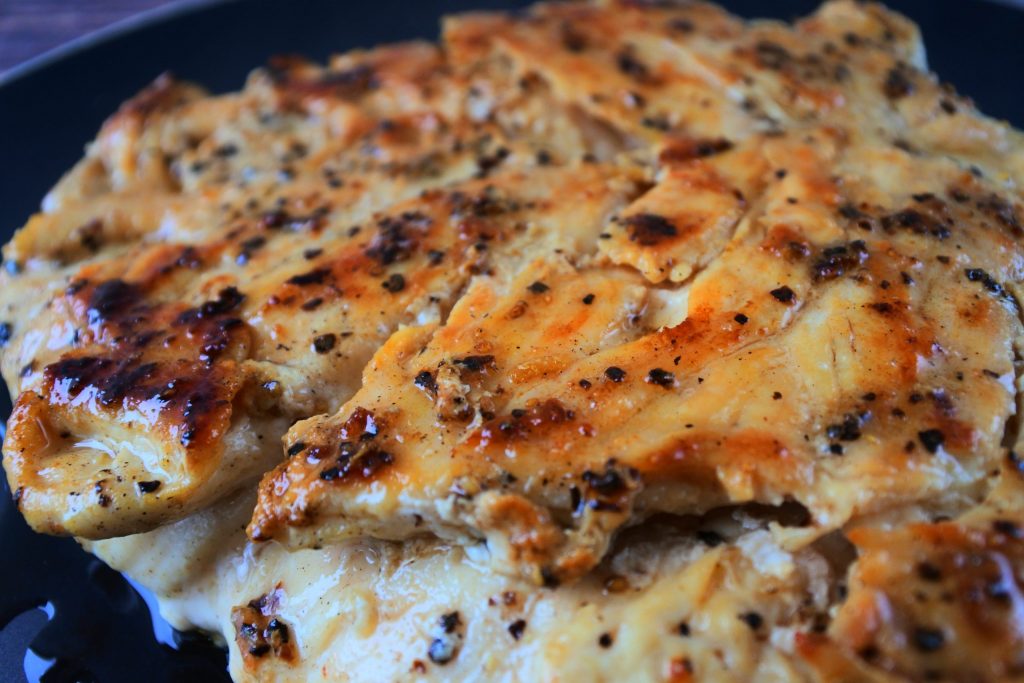
Once your chicken is beautifully browned, and cooked to temperature (165F) remove it from the heat and set it onto a plate to rest for at least 5 minutes. Be sure to tent your plate loosely with foil. This allows the connective tissue to relax from all that heat you just applied and will allow it to reabsorb and redistribute its own juices.
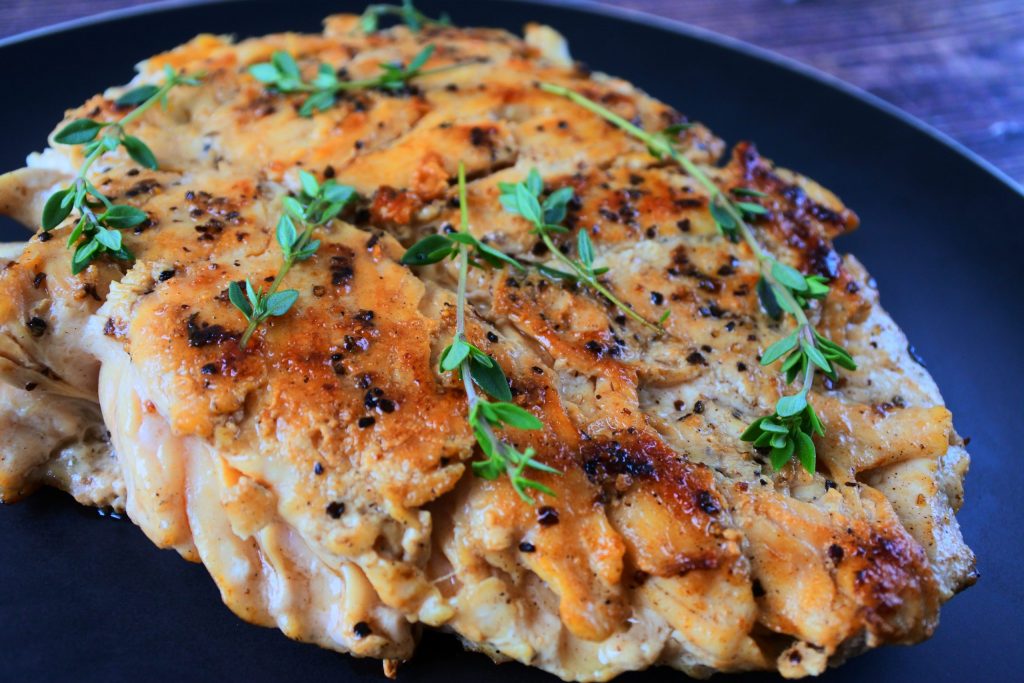
Do you see how juicy it looks in the above image? Look at the crust’s color. You can even see the juices on the plate on the bottom left corner. I only wish you could smell how amazing it smells. When will we ever get around to creating smell-o-vision I wonder!

Once your chicken has rested you can garnish it with fresh herbs. This step is totally optional, but you have to admit, it makes for a pretty picture! 🙃
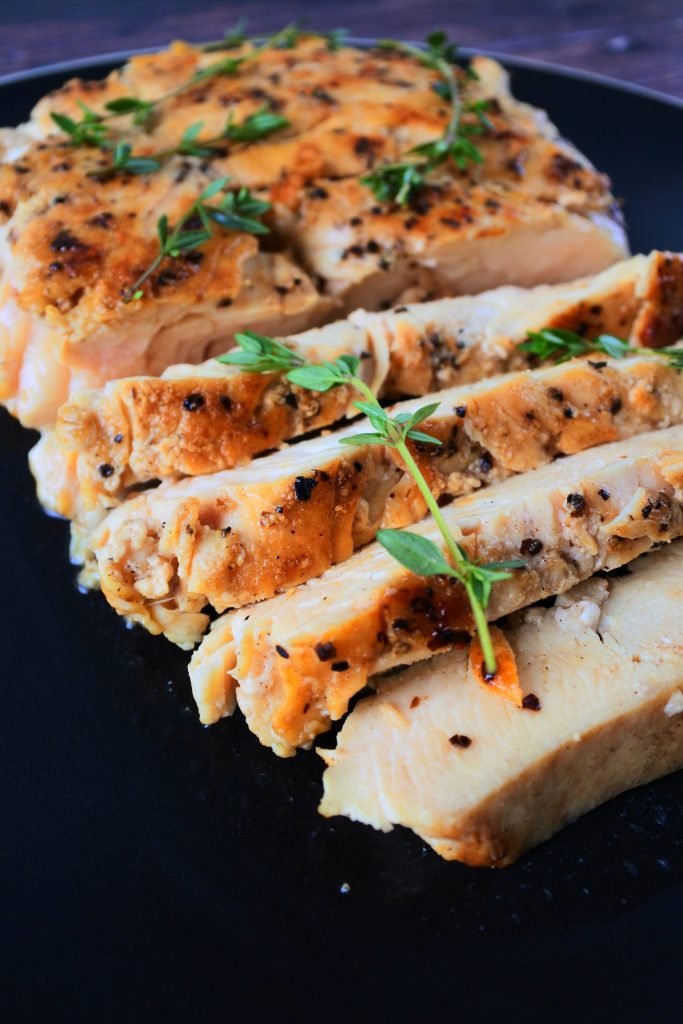
And the final, final step. Slicing and serving your succulent chicken.
Remember to cut against the grain to sever the connective fibers. If you cut with the grain, you’re going to end up with long stringy strands which affects the bite and tenderness of your meat. Now all that’s left is to decide what to serve your chicken with. Honestly the options are never ending for this blank-canvas dish.
Here are some ideas for you to pair your chicken with:
- Smoky Green Beans
- Roasted Garlic Parmesan Mashed Potatoes or a Delicious Cauliflower Mash (for those who are watching their carb intake)
- Creamed Spinach
- Gluten-Free Cheddar Biscuits
- Cheesy Bacon Butternut Squash
- Ultra-easy Smoked Gouda Mac and Cheese
- Simple Coconut Saffron Rice
- Or you can dice and add it to yours salads such as my Cobb Salad or upgrade your Caesar Salad (with a homemade dressing) into a Chicken Caesar salad!
Which one is your favorite option to pair with or use this chicken in? Connect with us (@kitrusycleaneat and #kitrusy) and let us know!

The Easiest Pan-Seared Chicken
Ingredients
- 1 large boneless, skinless chicken breasts (approx 1lb or 16oz)
- 1 tsp Himalayan salt (to taste)
- 1 tsp ground black pepper (to taste)
- 2 tbsp extra light olive oil (enough oil to coat the bottom of your skillet)
Instructions
- Using a meat mallet, pound the chicken breast until it is flat and even on all sides. If using a bone-in cut of chicken, skip this step.
- Pat your chicken breast dry using a paper towel and generously season both sides of your flattened chicken breast with salt and pepper
- Heat a skillet on med-high heat until almost smoking. Add olive oil and swirl to coat the pan with the oil.
- Gently place your chicken down into the pan and allow it to cook untouched for 4-5 minutes until a golden crust develops and the chicken releases from the pan on its own.
- Flip and cook the other side for an additional 4-5 minutes. Your chicken should have an internal temp of about 165°F
- Once cooked, remove and set aside onto a place loosely tented with foil and allow it to rest for an additional 5 minutes.
- Top with herbs of your choice (optional) and serve. Store any leftovers in an airtight container in the fridge for up to 4 days.
Notes
- Flattening your chicken ensures an even cook and creates a flat surface for maximum contact with the pan which gives a better sear all around.
- However, if using a bone in breast or thigh, do not pound your chicken.
- Once you set your chicken into the pan do not move it around. If you try to turn your chicken and find that it is stuck to the pan do not tear it free, but leave it to release on it's own.
- To make your chicken even more flavorful and decadent you can add a knob of butter to your hot skillet while your butter is melting, add herbs of your choice (such as fresh thyme, rosemary and garlic) and to the butter and then quickly spoon / baste your seared chicken with the herbed butter. Remove your chicken from the pan to a plate and pour the butter and place the basted herbs over the top of the chicken. Tent, rest and serve.
