Disclosure: This post may contain affiliate links.

Consisting of a luscious filling that isn’t cloyingly sweet but rather is smooth and creamy that gets sandwiched between two soft, chocolaty cake rounds, these iconic whoopie pies are, in my humble opinion, the best of everything. Easy to make and gluten-free you’re going to absolutely love these!
💕 Why You’ll LOVE this Recipe:
- It uses simple, pantry staple, clean eating ingredients.
- It’s gluten-free and made using almond flour.
- It has an amazing cake-like texture that remains biteably soft even when fully frozen.
- It has a great rich chocolaty flavor profile and a phenomenally addictive bite texture to it.
- It’s incredibly easy to make and can be whipped up in no time.
- It keeps in your freezer for 2-3 months.
- It’s a portably cookie shaped chocolate cake sandwich, what’s not to love!🤩
So…What Are Whoopie Pies?

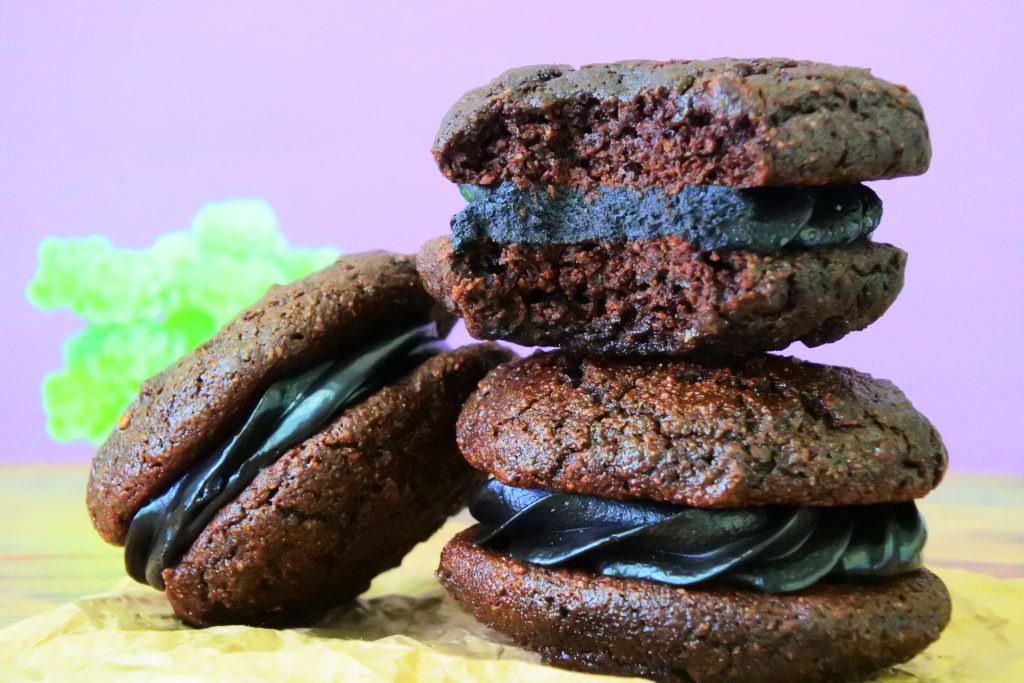
A New England dessert staple, the whoopie pie is also known by other names including “Big Fat Oreo” aka BFO, Black and Whites or Black Moons, and are a cakey sandwich consisting of two cake rounds with either frosting/icing or marshmallow fluff filling. Think of it almost like a slice of cake meets an ice cream sandwich’s bite texture and portability. Best associated with the state of Maine where it’s the official state treat, this early 20th century stroke of sweet treat genius’ real origins aren’t exactly known though many lay claim to it – including the Pennsylvania Dutch, but regardless of where and when, we can all agree that the world is a little bit sweeter thanks to it’s creation.
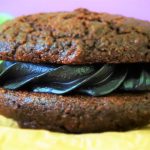
Now, you may notice that my chosen filling is almost jet black, that’s my special touch to this recipe, and would you believe me if I told you that it’s totally natural and that no dye or coloring was used? This is my version of an Oreo cookie flavored frosting that’s made using a specialty black cocoa powder! How fancy, right?
What Is Black Cocoa and Does It Really Taste Like Oreos??
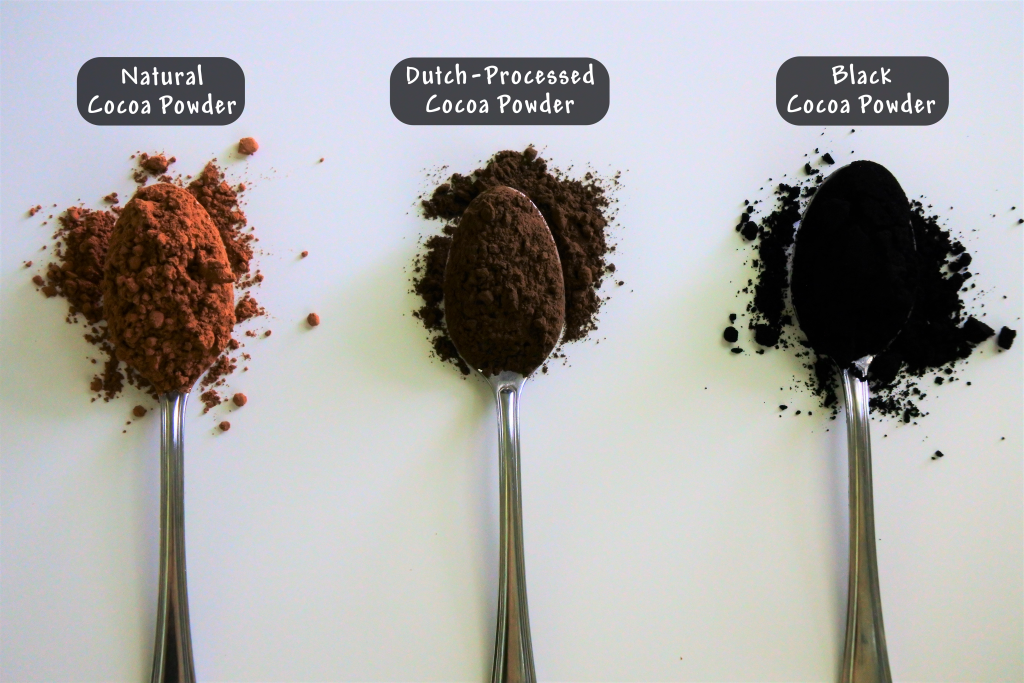
There’s a few things to know about this delicious and potent ingredient, the first of which is it’s incredibly black color and flavor that is said to be similar to oreos, well more specifically the oreo cookie which makes sense since the cookie part of an Oreo is make using…you guessed it, black cocoa! That’s why it has that incredibly rich black color that doesn’t stain your teeth and tongue like food dyes do.
So what exactly is black cocoa powder? Put simply, is an ultra-Dutched cocoa powder. Natural cocoa powder is acidic in nature, dutched cocoa powder has been treated with an alkali to reduce that acidity, and black cocoa powder has been treated even more intensely with alkali to almost completely reduce its acidity which leads to a cocoa powder that is not as bitter or as chocolatey tasting as natural cocoa powder is and that is has that iconic black hue that is reminiscent of charcoal powder.
It also means that it’s a bit trickier to bake with because it is not reactive like natural cocoa powder is (so rising agents like baking soda will not react to it) and it contains almost no fat so it doesn’t give that mouth coating richness you’d expect with a cocoa and baking with it means you need to add in additional fat and moisture (Greek Yogurt or oil tends to work best depending on the recipe) to compensate or you risk your baked goods being dry and crumbly.
For these reasons, it’s why I think the black cocoa works perfectly in just the frosting for this recipe and gives a great “Oreo Cream” touch. So do you NEED to use it in this recipe? Not at all. You can still make this recipe without it and simply substitute the black cocoa powder for any cocoa powder of your choice!
So without further ado, here’s how insanely easy this gluten-free treat is to make!
Ingredients Needed for the Chocolate Cake Rounds
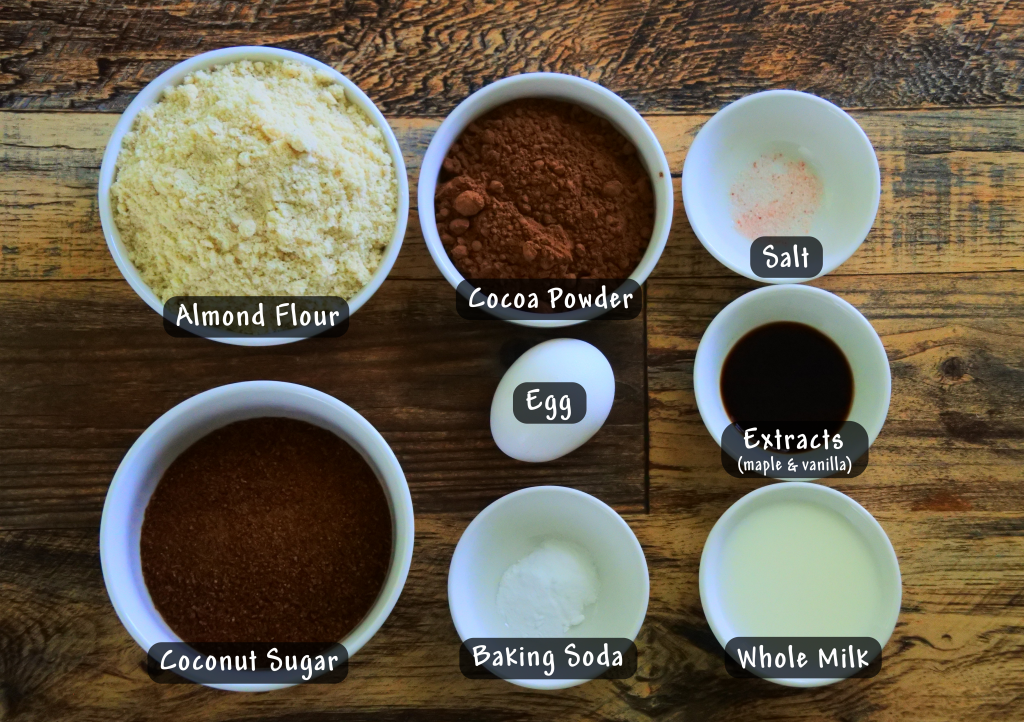
- Almond Flour: I’m using a superfine grind of blanched almond flour. Opt to use this for the best texture.
- Cocoa Powder: Use a natural cocoa powder.
- DO NOT use a Dutch-processed (aka dark or black) cocoa powder for this part of the recipe, doing so will affect the cake’s rise and texture. Our main rising agent is baking soda. Baking soda will react with natural cocoa powder to give rise, but dark or black cocoa powder will not.
- Salt: A small pinch of salt enhances the flavor of our cake. I’m using a Himalayan pink salt but you can also use a sea salt.
- Coconut Sugar: I love using coconut sugar for this recipe both for its flavor, final bake texture and because it’s a great low GI sugar.
- If you’d like you can replace it with finely blended raw cane sugar or evaporated cane juice sugar.
- Baking Soda: Ensure you’re using baking soda and not baking powder for this recipe.
- Egg: I’m using a US standard large egg.
- Milk: The main liquid for this recipe, I’m using full fat/ whole milk.
- you can also use coconut milk or any other unsweetened dairy-free milk of your choice.
- Extracts: I’m using vanilla and maple extract. You can use both or either one.
While this recipe is somewhat flexible and forgiving, I don’t recommend making too many substitutions as I’ve specifically developed it to achieve a certain taste and texture.
How To Make the Chocolate Cake Rounds
As always the first step is to preheat our ovens to 350F and line a baking tray with parchment paper.
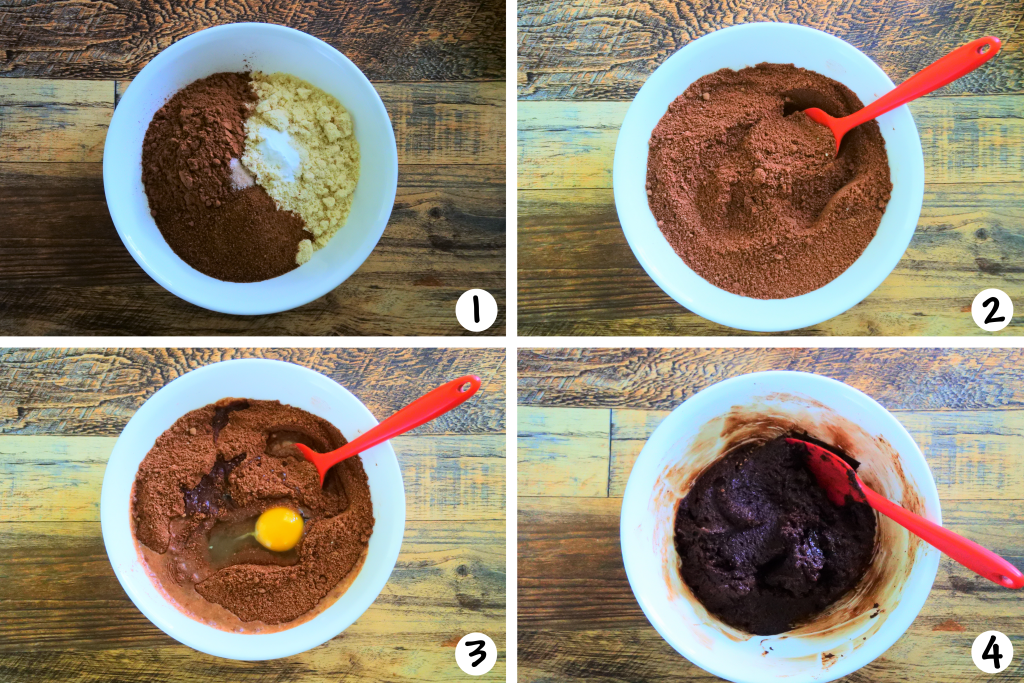
Easy as can be, simply add your dry ingredients into a medium-sized bowl and combine it (1 & 2). I highly recommend you sift your dry ingredients (or at least the cocoa powder which I did not do…learn from my mistake! 😅). Add in your egg, milk and extracts (3). I recommend you start with 3tbsp of milk and once everything is thoroughly combined together check your texture and if it’s a bit too dry ((like in the above 4th image) add an extra tbsp of milk.
You want your batter to be slightly thicker than a brownie batter but still moist and soft (sticky) enough to spread a bit around the edges once your place it onto your baking sheet.

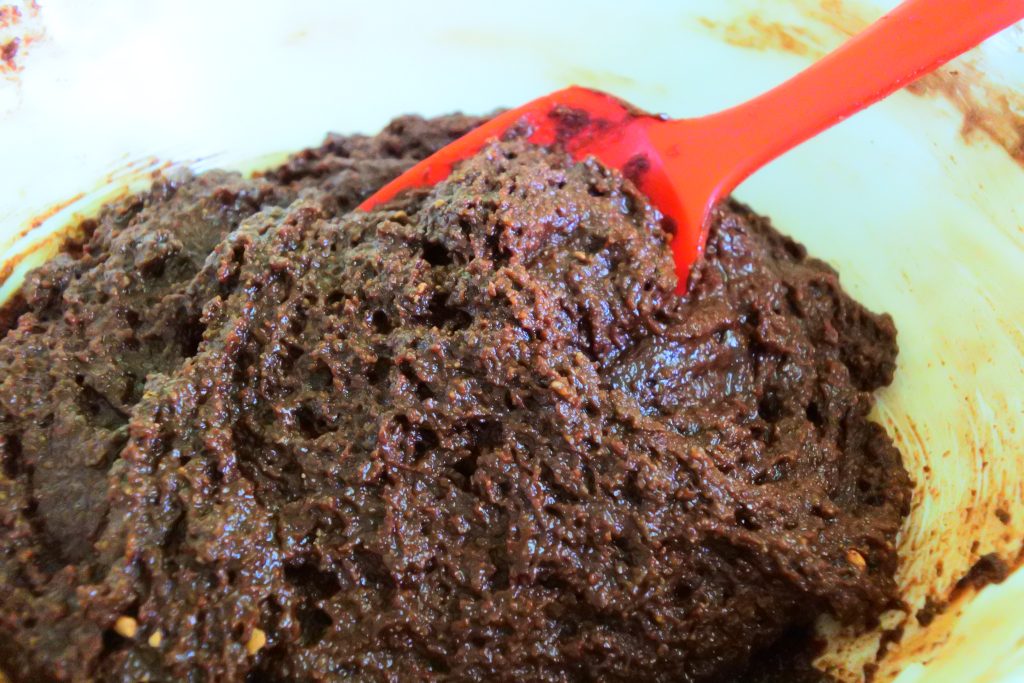
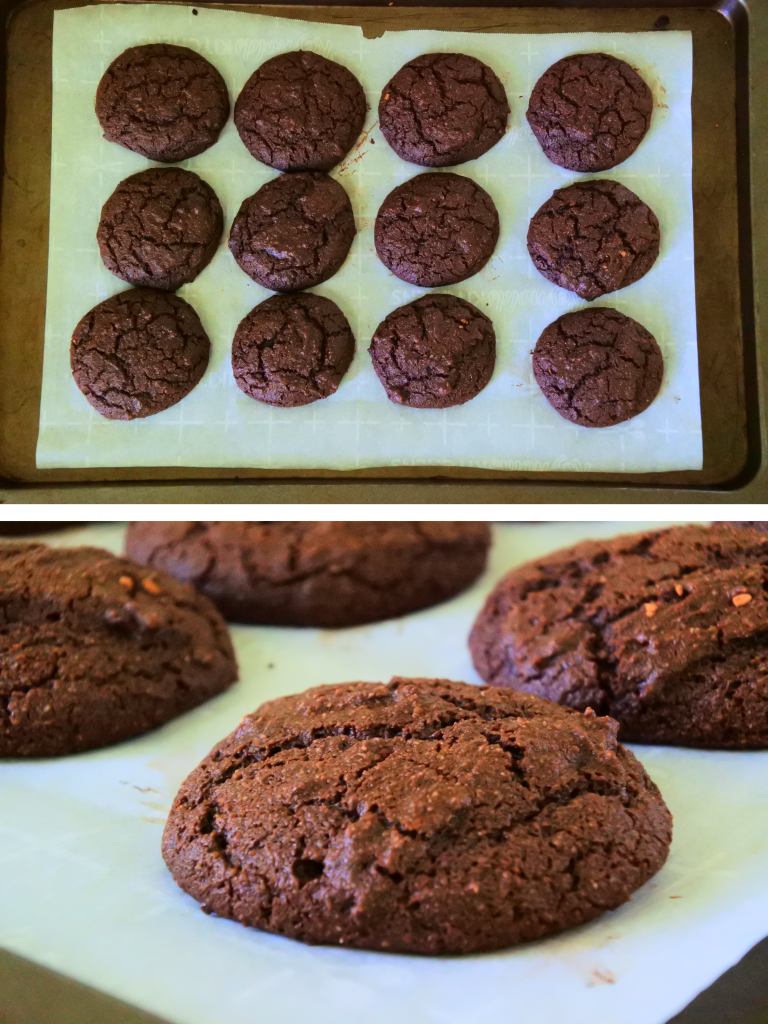
Using a tablespoon measure, slightly overfill it into 12 evenly portioned scoops and place each onto a parchment-lined baking tray with 2″ – 3″ between them. The cake rounds should spread out around the edges just slightly after about 10-20 seconds, if it doesn’t and it stays in the scoop shape, the batter might be too dry and might need a bit more milk. If however your batter spreads immediately and flattens out it’s too thin and you should add a touch more almond flour to help it thicken up a bit. You can see in the above image that it’s thick but still moist.
Using a silicone spatula shape your rounds to be the same size and shape and to get them as round as possible.
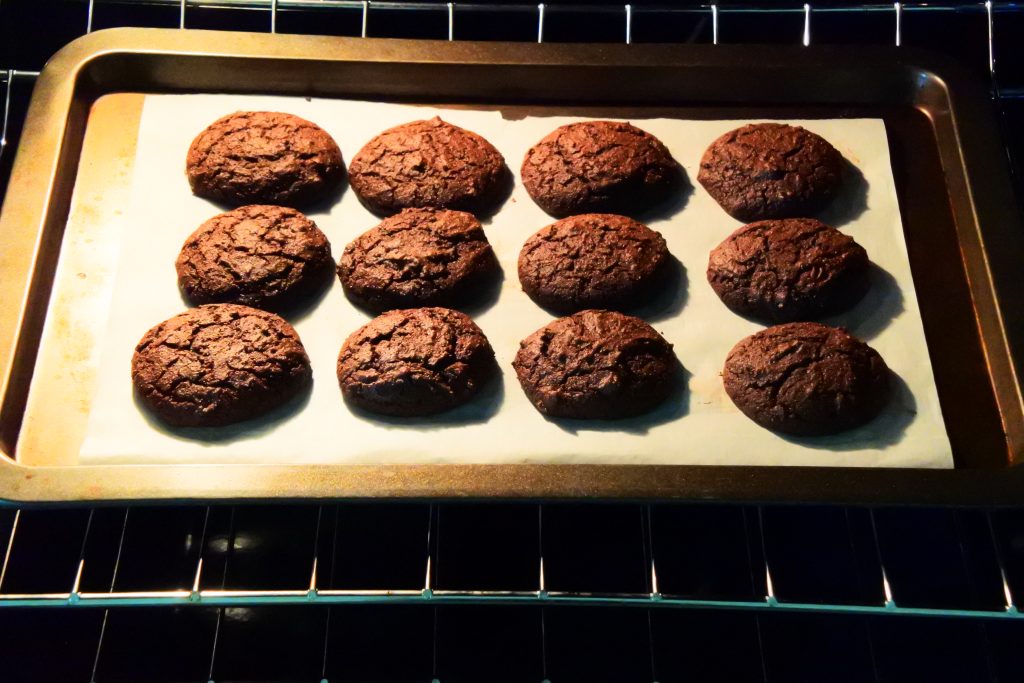
Bake your cake rounds in the preheated oven for 10-12 minutes at 350F. They should spread out and rise a bit with slightly cracked tops.
Once they’re baked, remove them from the oven and allow them to cool, undisturbed on the baking tray until they’ve completely cooled down. To speed up this process you can let them cool for about 15 minutes at room temperature and then place the entire baking tray into the freezer (or fridge) for 20-30 minutes until they’ve completely cooled down.
Do not try to frost your cake rounds if they’re hot or even slightly warm. They need to be completely cooled.
Ingredients Needed for the “Oreo Cream” Filling

- Icing Sugar: Also known as confectioners sugar or powdered sugar. Opt to use a clean eating version or you can make your own by blitzing raw cane sugar into an ultra fine powder in your high powered blender.
- Cocoa Powder: For this frosting, I’m using a specialty Black Cocoa powder which has the distinctive flavor of Oreo cookies. If you don’t have it on hand, feel free to use any unsweetened dark or natural cocoa powder.
- Whole Milk: I’m using whole milk but you can use cream or even just water if preferred.
- Vanilla Extract: A great flavor complement to the cocoa powder.
- Butter: Oddly enough this recipe only uses a small amount of butter, you can use salted or unsalted.
- Salt: A small pinch of salt really enhances the flavor profile of the frosting’s sweetness.
How To Make the Filling/Frosting
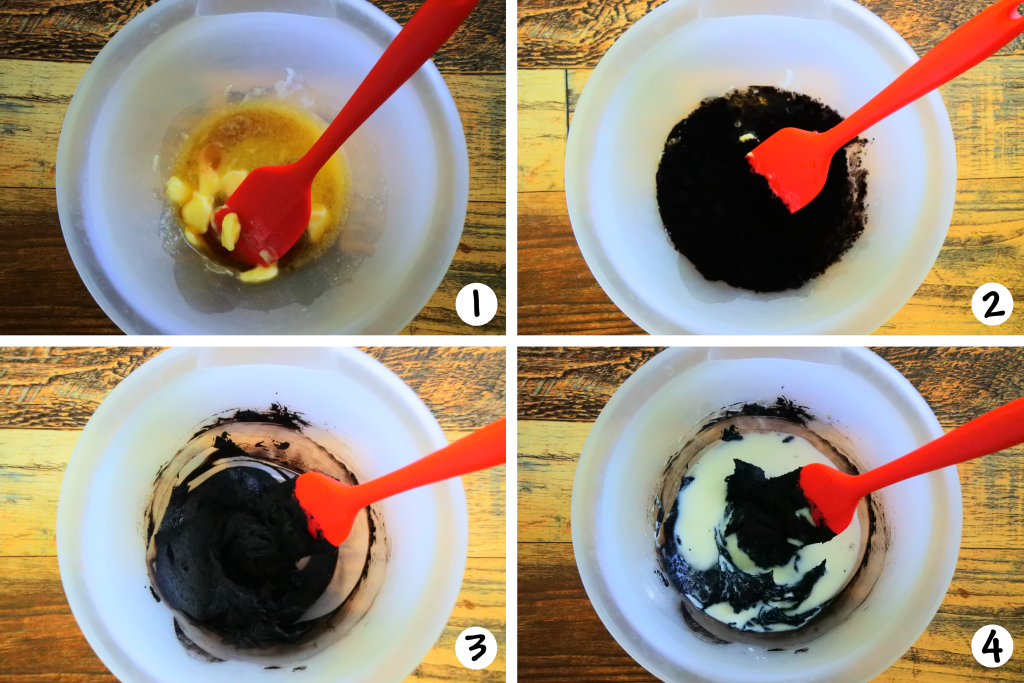
To a small bowl add your softened/semi-melted butter along with the salt, vanilla and your cocoa powder (1,2). Mix the cocoa powder into a thick paste (3) and then add the milk (4).
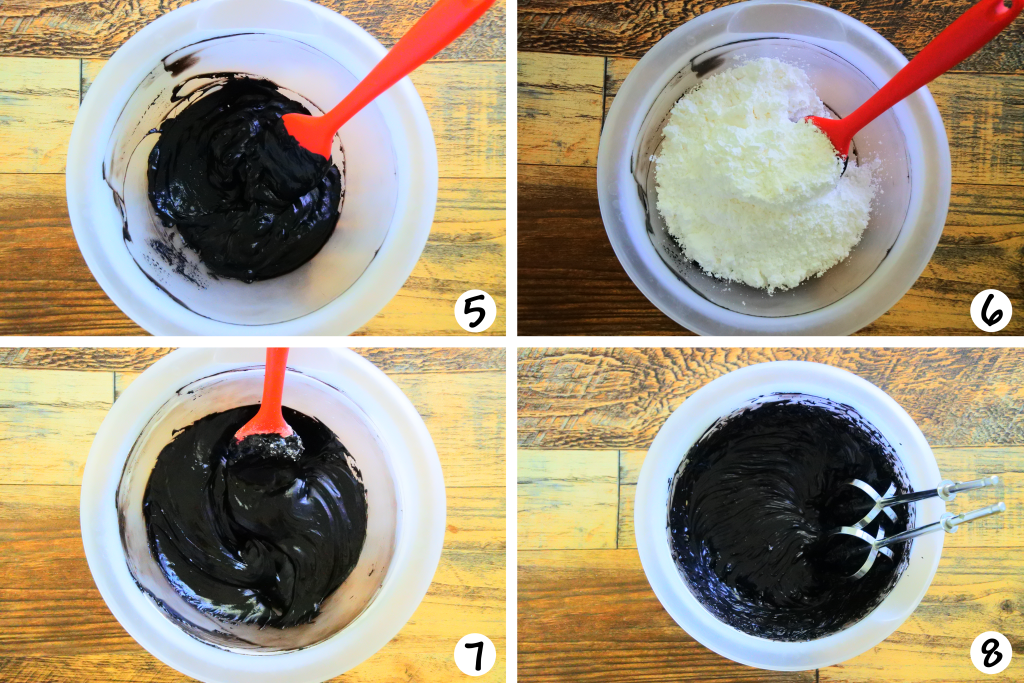
Carefully incorporate the milk until your have a smooth paste (5) and then add in all of your powdered sugar (6). Using your spoon or spatula mix in the powdered sugar completely (7) and then using an electric mixer or whisk, whip your frosting for a few minutes until it gets aerated and glossy (8).
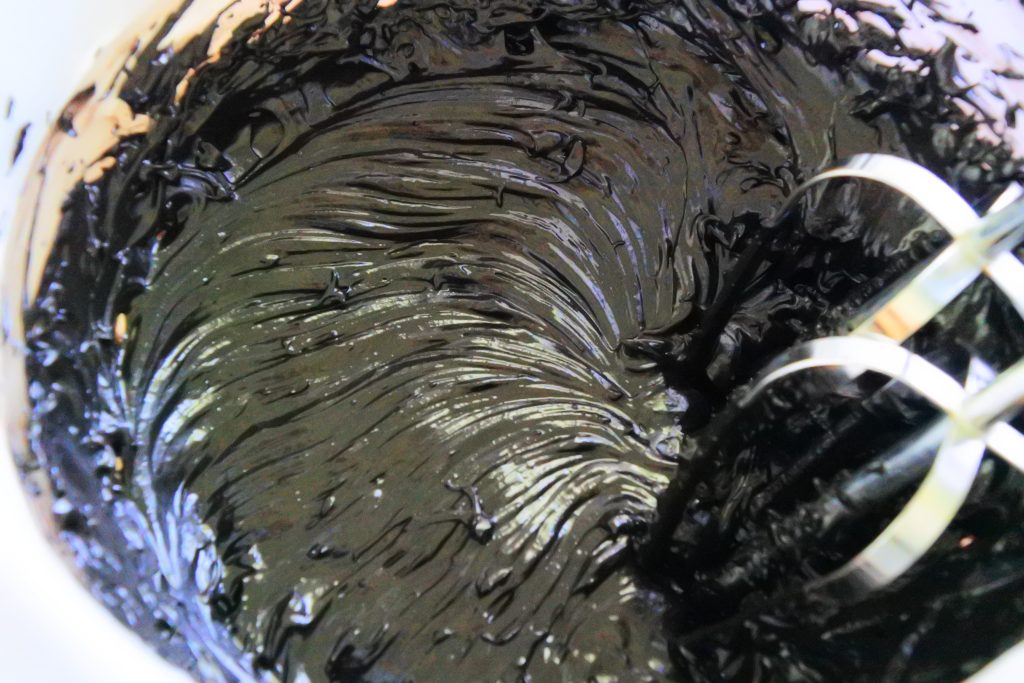
You want to be sure your frosting is firm enough to be able to hold its shape. If it seems too thin or loose, add in more icing sugar and whip it again.
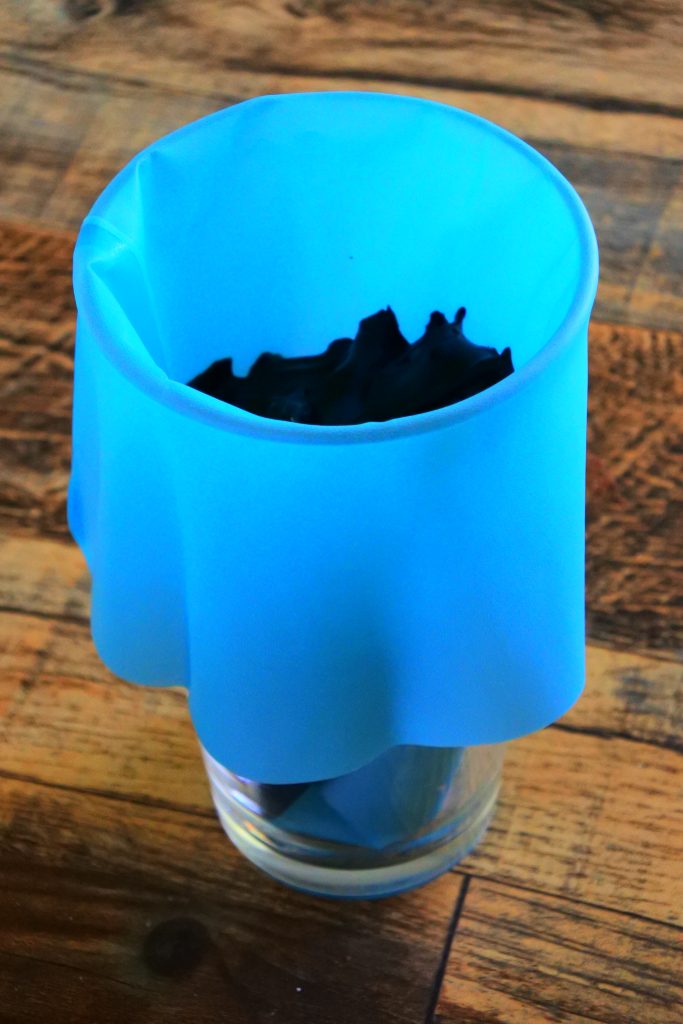
Add your frosting into a piping bag with a large tip or you can use a sandwich bag with the end snipped off. Alternatively you can just spoon a blob of filling into your cake rounds. The choice it yours.
Assemble Your Whoopie Pies
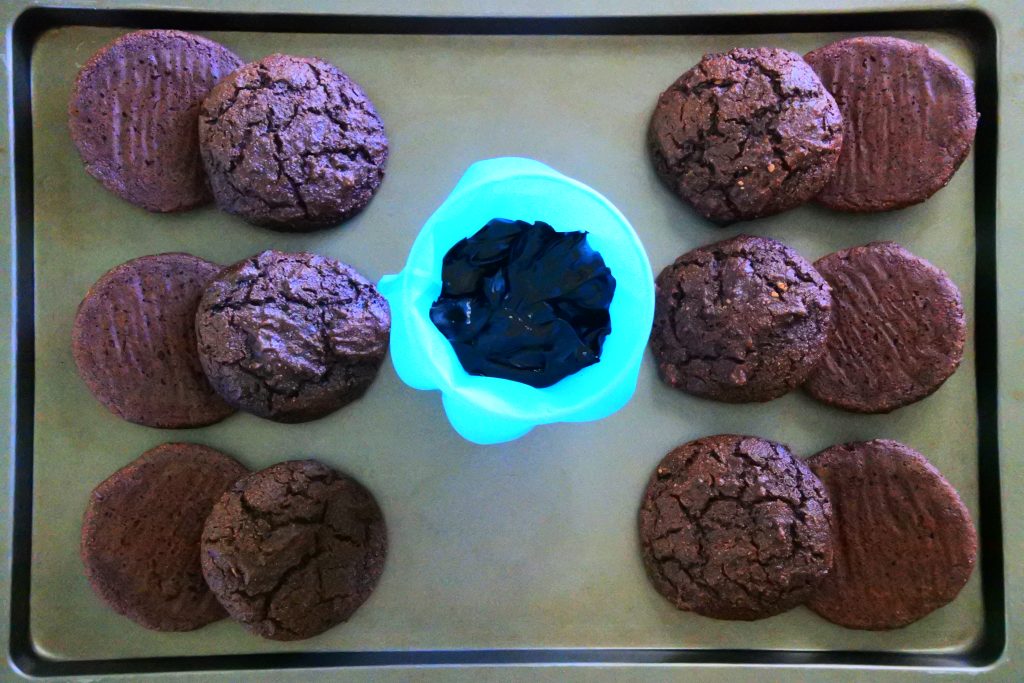
With your cake rounds COMPLETELY cooled and not at all warm still, you’re going to want to find them each a matching partner.
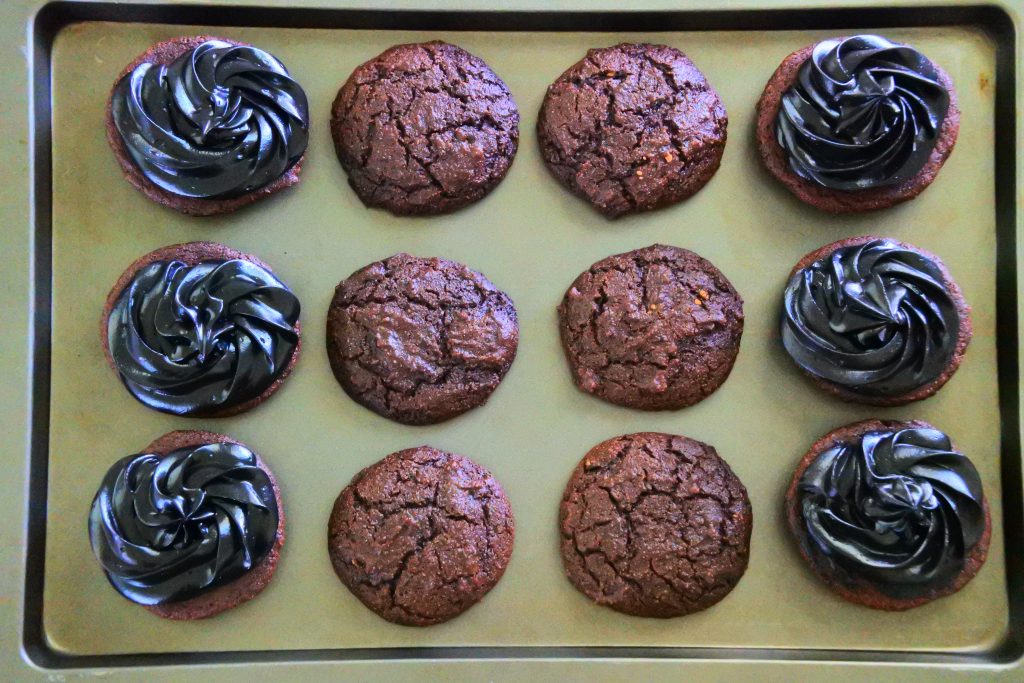
Then pipe your frosting onto the underside of half of your cake rounds. With a large tip on my piping bag, I start on the outer edge and go all the way around and end in the middle.
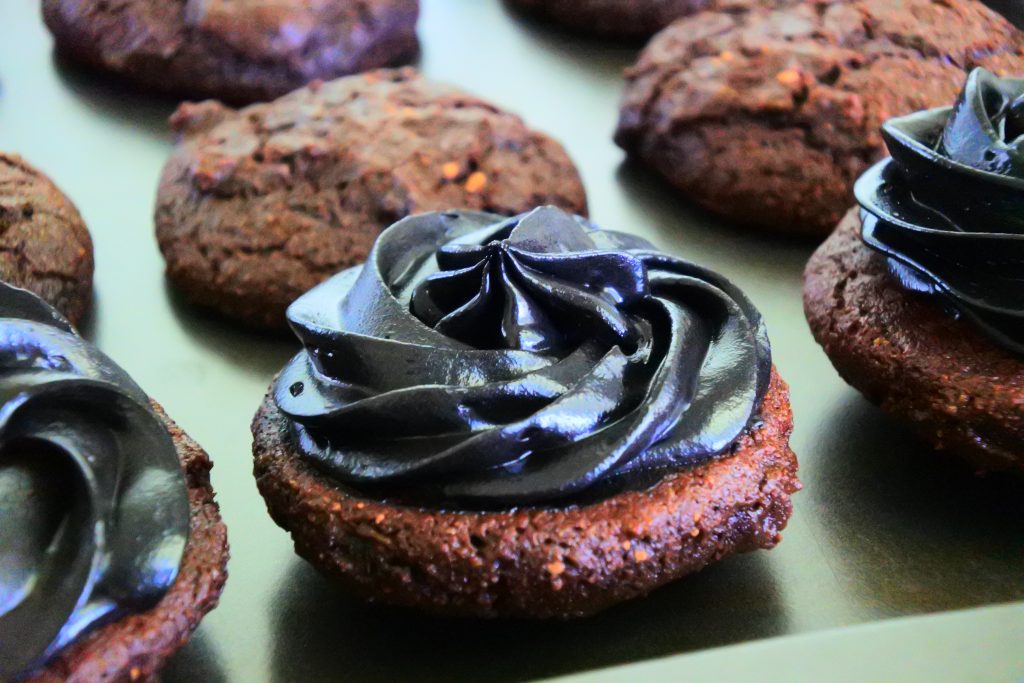
Just look at how glossy and silky smooth our frosting is!
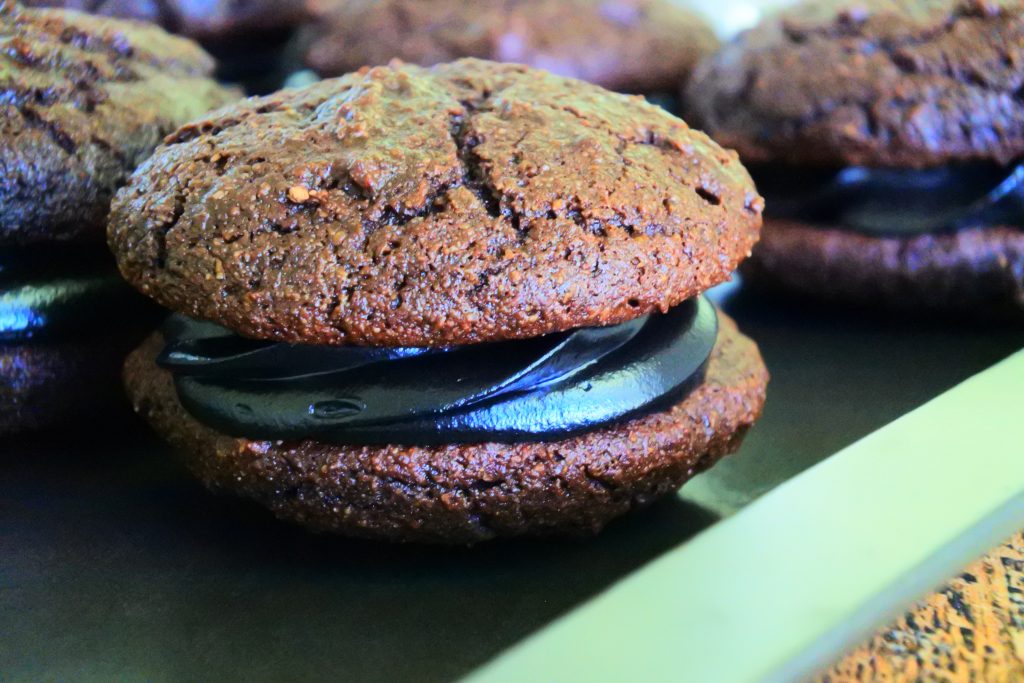
Place your cake round pair on top to complete the sandwiched together whoopie pie and enjoy!
Storage Notes
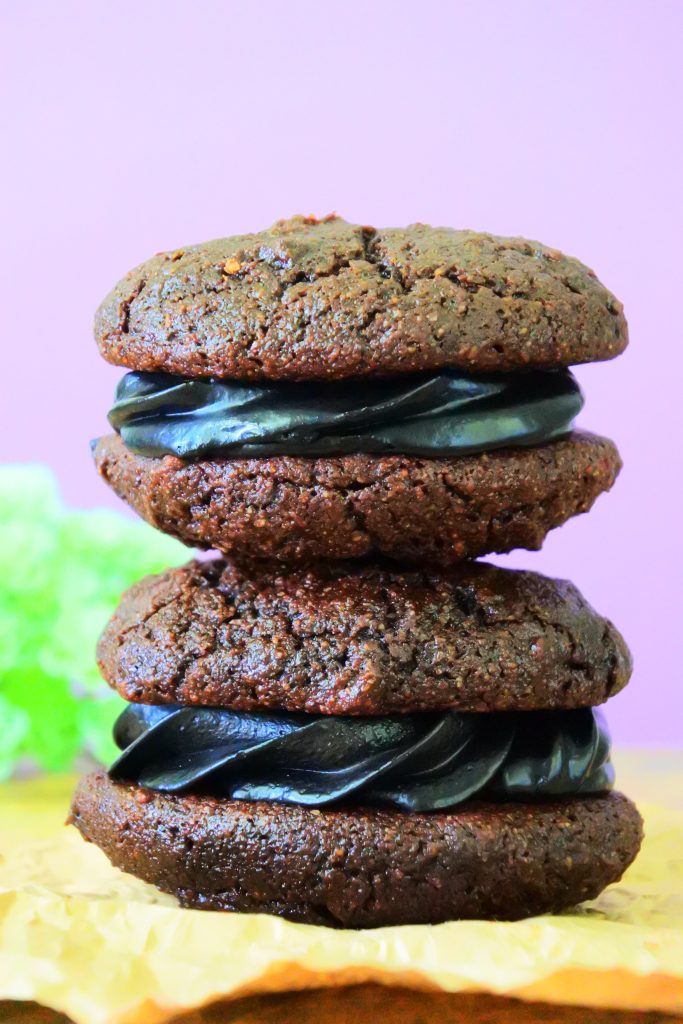
While you can keep these stored in your fridge for up to a week, I highly recommend just keeping them stored right in your freezer either in an airtight container or a bag with as much air as possible removed. Not only will they last for several months in the freezer but they never freeze into a rock solid state and can be eaten right out of the freezer while maintaining an ice cream sandwich softness to them! 🤤
And there you have it, easy and simple, clean eating and gluten free, these whoopie pies will have you shouting their name in celebration so be sure to give this recipe a try and let us know what you think about it in the comments!
The BEST Gluten-Free Whoopie Pies
Ingredients
Cake Rounds:
- 1 1/3 cup blanched almond flour
- 1/3 cup cocoa powder (opt for natural not dark)
- 1/2 cup organic coconut sugar
- 3-4 tbsp Whole Milk or full fat coconut milk to make it dairy free
- 1/4 tsp Himalayan salt
- 1/2 tsp baking soda
- 1 large egg
- 2 tsp vanilla extract
- 1 tsp maple extract (optional)
Filling/Frosting:
- 1 1/2 tbsp salted butter softened
- 1 tsp vanilla extract
- pinch Himalayan salt
- 3 tbsp black cocoa powder or any kind of cocoa powder of your choice
- 2 tbsp Whole Milk
- 3/4 cup powdered sugar
Instructions
Cake Rounds:
- Preheat oven to 350℉
- To a medium bowl, soft together the dry ingredients: almond flour, cocoa powder, coconut sugar, baking soda and salt.1 1/3 cup blanched almond flour, 1/3 cup cocoa powder, 1/2 cup organic coconut sugar, 1/2 tsp baking soda, 1/4 tsp Himalayan salt
- Add in 1 large egg, your extracts and just 3 tbsp of milk to start and mix thoroughly until combined into a thick batter (it should be just slightly thicker than a brownie batter) If it is too thick, add in another tbsp of milk.3-4 tbsp Whole Milk, 1 large egg, 2 tsp vanilla extract, 1 tsp maple extract
- Divide into 12 equal portions and scoop out onto a parchment-lined cookie sheet (Use a tbsp measure scoop and overfill it just slightly) leaving 2-3" between each round and try to get them to be the same size and shape. Note that the batter should be moist enough that it slowly and slightly spreads out into a round on the parchment after 10-20 seconds. If you scoop it and it stays as a firmly scooped ball mound, then your batter might be too dry and you might need to add a bit more milk to it.
- Bake at 350℉ for 10-12 min and leave it on the parchment-lined tray to cool completely. If you want to speed up this process you can let it cool on the tray at room temperature for 15 minutes and then place it into the freezer for 20-30 minutes to chill and cool completely.
Filling/Frosting:
- To your softened/semi-melted butter, add the salt and vanilla extract, mix together and then work in the black cocoa powder until you have a smooth paste.1 1/2 tbsp salted butter, 1 tsp vanilla extract, pinch Himalayan salt, 3 tbsp black cocoa powder
- Add in the milk and mix it into the black cocoa mixture until smooth.2 tbsp Whole Milk
- Add in the powdered sugar and mix until fully combined and then, using an electric mixer, whip your frosting for 3-5 minutes until it is smooth and glossy and firm enough to hold its shape. If it is too runny you can either set it in the fridge to see if it sets for 10 minutes or whip in 1-2 tbsp more icing sugar. Your frosting should be thick enough to be piped and hold its shape.3/4 cup powdered sugar
Assemble your Whoopie Pies:
- Match your whoopie pie cakes into evenly-sized pairs and then either place a spoonful of the frosting into the middle of the underside of a cake round or pipe a swirl of your frosting onto the underside of a cake round starting from the edge and ending in the middle. Finish by placing the underside of another cake round on top to sandwich your icing in the middle.
Storage:
- Keep your whoopie pies in the fridge for up to a week, or better yet, in the freezer for up to two months. You can eat them right out of the freezer and they will remain soft without needing to be defrosted and will have a texture like an ice cream sandwich.
Notes
- This recipe makes 12 cake rounds which will make 6 whoopie pies.
- If you don't have a piping bag you can use a sandwich bag with the corner snipped off or just spoon a blob of the filling into the middle of the cake round.
