Disclosure: This post may contain affiliate links.

Whether you’re looking to use up leftovers or in need of a quick and easy, complete, one-pan meal option, this easy homemade shrimp fried rice has you covered. Utilizing some “secrets” you’ll be able to create a restaurant quality fried rice dish that will have you going back in for seconds!
 Here’s Why You’ll Love This Recipe
- It uses just simple and minimal pantry-staple ingredients.
- It’s gluten-free and clean eating.
- It comes together in less than 30 minutes start to finish.
- It’s a complete one pan meal that you can customize to your taste by adding your choice of protein or vegetables.
- It’s a great way to use up leftovers.
- It’s cost efficient.
Here’s What You Need To Make This Easy Fried Rice
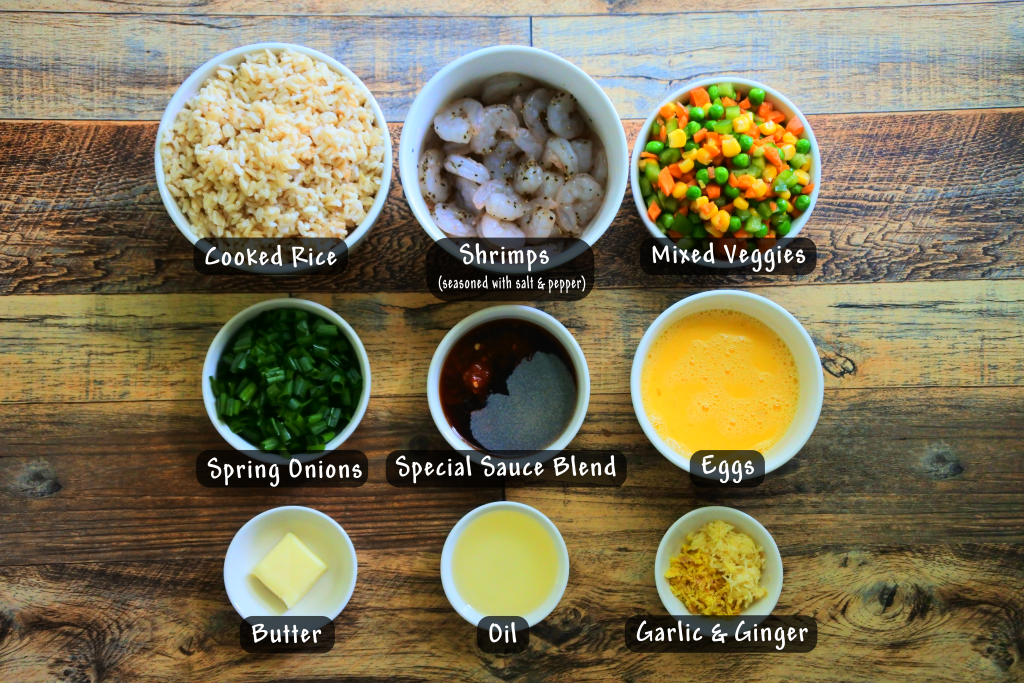
- Cooked and Cooled Rice: You can honestly use any kind of rice of your choice, the best options are medium grain white rice, long grain parboiled rice, whole grain brown rice (which is what I’m using today) or even jasmine rice.
- Shrimp: You can use any sized shrimp of your choosing but I like using ones that are smaller sized. To make prep easy, you can use a pack of frozen raw, peeled and deveined shrimp that you’ve thawed. We’ll also be seasoning our shrimp with a touch of salt and black pepper.
- Vegetables: I’m using the classic blend of diced carrots, green peas and kernels of sweet corn. This is a great way to include vegetables into your dish and it adds great color to the final plate as well.
- Special Sauce Blend: We’re going to flavor our fried rice with a sauce that is a phenomenal flavor bomb. In it we’ll include:
- Tamari/Soy Sauce: Umami rich and salty, this perfectly flavors our fried rice. If you’re gluten free ensure you’re using a gluten-free brand of soy sauce or use tamari (which is soy sauce that does not contain wheat/gluten).
- Ground White Pepper: With it’s mild heat and earthy almost fermented grassy flavor profile white pepper is ideal for this fried rice especially when combined with
- Rice Vinegar: Adding vinegar to our rice is a great kick of flavor and a pop of acid but it does more than that, it helps the starches in our rice to break down which allows the rice to absorb even more flavor! You can use either seasoned or unseasoned rice vinegar. Using the seasoned variety adds just the slightest hint of sweetness which can perfectly complement your rice!
- Fish Sauce: Umami, earthy and incredibly savory, fish sauce brings all needed elements that highlights and unites this fried rice.
- Chili Garlic Sauce: This ingredient makes adds a wonderful pop of heat that rounds out and complements all other flavors in this dish.
- Garlic: Fresh garlic works best here but you can also opt to use dehydrated garlic if preferred.
- Ginger: Freshly grated ginger root is potent but perfect for the base of our fried rice. Don’t skip it!
- Eggs: I’m using US standard large eggs. You can use whatever size you prefer.
- Oil: Opt to use peanut oil as your first choice. A great alternative is avocado oil or sesame oil. While sesame oil is usually a finishing oil, both of these oils have a high smoke point and imparts a mild nutty flavor to the rice.
- Butter: A small pat included with the oil and melted down until browned and bubbling is a bit of a restaurant secret that imparts a phenomenally toasty flavor to the rice. You can opt to use salted or unsalted butter. Or if you’d like to keep the dish dairy-free, opt to use ghee.
- Spring Onions: Or green onions or scallions. Added almost at the end this savory-sweet herb adds a pop of color and a fresh zing of flavor.
Do I Need to Use Day-Old Cold Rice?
This is a bit of a trope that I’ve always known to be the recommendation and I think the reason for that is that most fried rice recipes are made from leftovers that are quickly reheated and tossed together and old/cold, day old rice is ideal for this purpose. Another reason for this trope is that ideally you DO want the rice to be as dry as possible and cold rice has dried out a bit as it’s no longer steaming or hot.
With that in mind, the answer for if you NEED to use day old rice is no. You can use rice that you’ve cooked on the same day however if you do, you’ll want to spread the hot rice out onto a sheet pan and fan it or allow it to release all of the steam/heat and come to room temperature. That will essentially remove enough moisture to ensure your fried rice isn’t soggy.
 The “Secrets” To Making A Great Fried Rice:
Before we begin, let’s go over some of the tips and tricks to ensure a great fried rice every single time that is as close to restaurant quality fried rice.
- Mise En Place: Meaning “putting in place” or more simply, having all ingredients prepped and ready to use. This step is SO important. This rice comes together quickly so you want to be sure you have all of your ingredients lined up, measured out, and ready to go. You don’t have time to leave your stove to go hunt anything down. Aside from your skillet/wok and spatula you’ll need your ingredients in this order:
- oil & butter
- salt and pepper seasoned shrimp
- ginger & garlic
- vegetables
- rice
- special sauce blend
- eggs
- spring onion
- The Pan: Use a LARGE wok or heavy bottom skillet (a well-seasoned cast iron is highly advised as a wok alternative) so that your ingredients can be spread out without being over-crowded and so that all your heat is retained and evenly distributed. Speaking of which…
- Heat: You want to crank things up as hot as your stove allows. Keep in mind in restaurants they use the equivalent of a flame thrower under their woks, we don’t have that firepower at home but nonetheless you want things to be as hot as possible so keep your heat on high. Fried rice comes together by layering and seasoning precooked and prepped ingredients so we’re not really cooking anything, just combining and heating them up.
- Timing and Order: The order of ingredients and the cook time between add ins is important for the best results. Don’t just throw everything into the pan at once. Follow the recipe and add them as recommended, taking the time to toss and fry between each add in.
- Keep it Simple: Don’t overwhelm your rice by adding in too many things. Fried rice is a simple dish of which rice is the star. Too many add ins will muddle the flavor of your dish. For that reason I’ve kept this recipe as simple as possible, however you can add to it if you like but keep it simple and limited (about a cup of add-ins).
- Keep it Moving: With the heat on high you want to keep things in the pan moving around so that they don’t burn but they are still able to attain a slight char and a bit of a smoky flavor.
Now, Let’s Make Some Fried Rice In 10 Easy Steps!
Ensure you have all your ingredients lined up in order and ready to go.
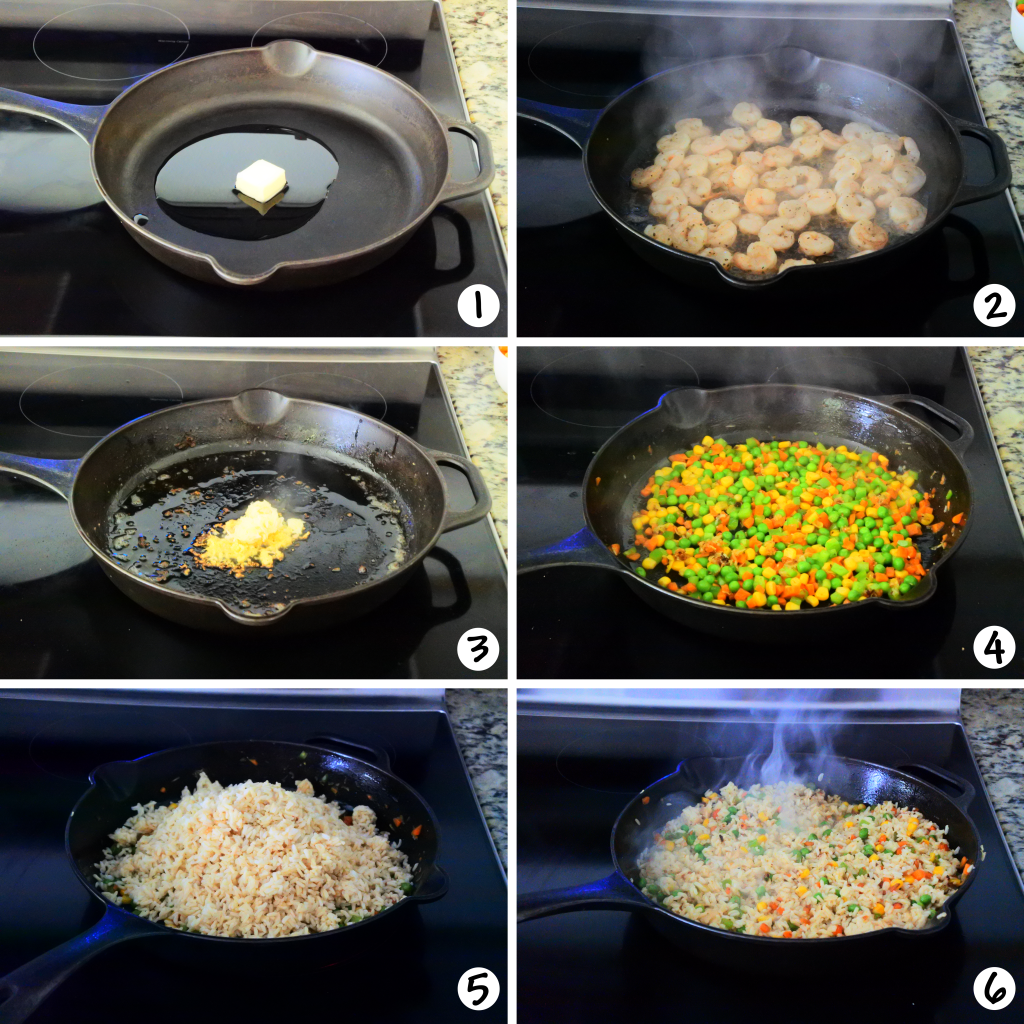
Grab the largest wok or skillet you have, set it on med-high heat and add the oil and butter to it (1). Once the butter is melted and sizzling add in your salt and pepper seasoned shrimp, allow the shrimp to cook for a few minutes until they are pink and no longer translucent (2) then remove them from the skillet and set them aside. Be sure to leave as much of the oil in the pan as you can.
Add in the grated garlic and ginger and flash fry for 20-30 seconds until fragrant (3) then add in your mixed vegetables. Fry your veggies for 2 minutes turning occasionally. If you’re using frozen veggies, fry for an additional 2 minutes to ensure that most of the moisture is fried off (4).
Now, crank your heat up to HIGH and add in your rice (5) and toss it with the vegetables (6). Let it sit for about 30 seconds if your pan isn’t screaming hot yet, once it’s significantly hot (you might even have a few rice grains pop), begin to toss and move your rice around constantly for 2 minutes. If your rice begins to burn you can lower the heat a bit.
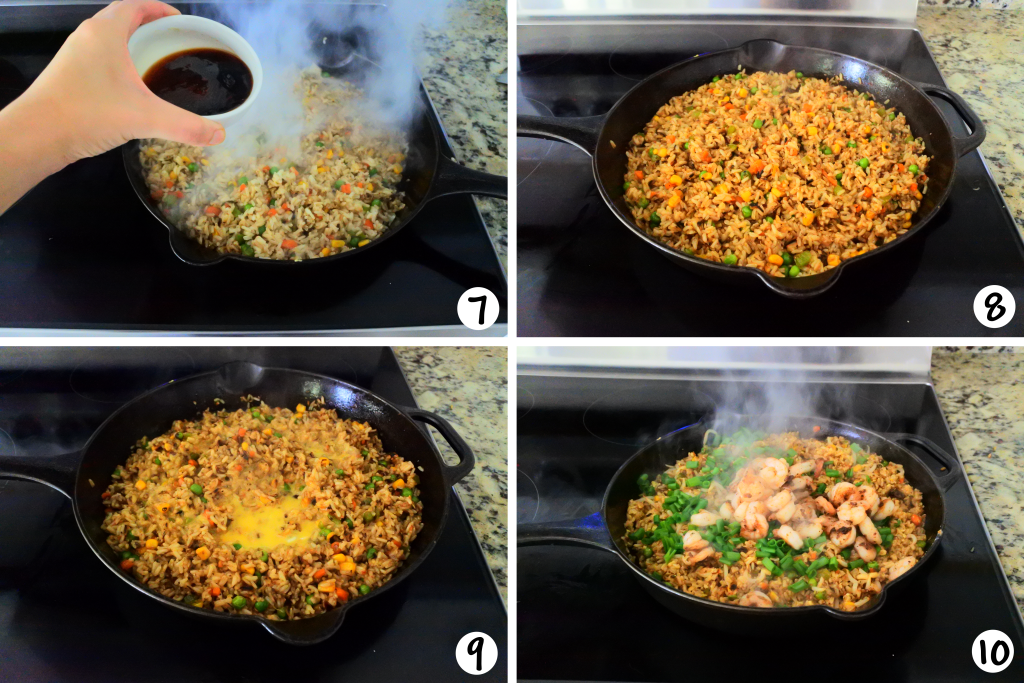
Add in your sauce blend (7) and immediately continue to constantly turn and toss your rice until all grains are coated with the sauce. Fry for another 2 minutes turning constantly (8).
Now you can lower your heat again to med/med-high, and while still moving the fried rice around, pour the beaten egg all over the rice and working quickly mix it into the rice so that all grains of rice become coated in the egg (9).
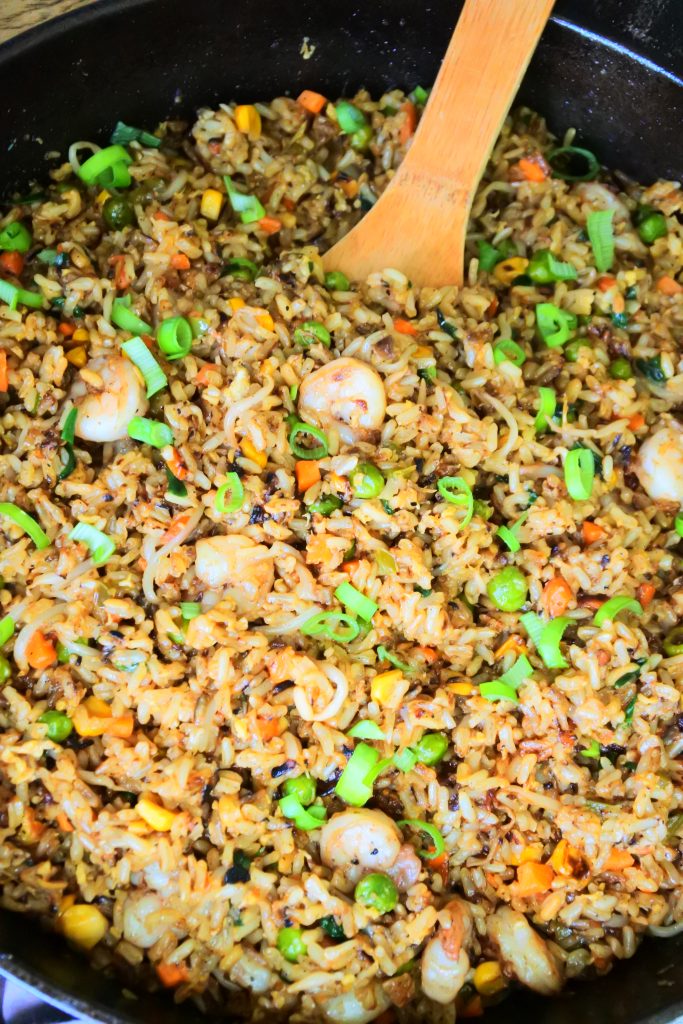
Finally, turn off the heat and add back in your pre-cooked shrimp and finish by adding in the chopped spring onions (10).

With everything mixed together, let your rice sit for 5-10 minutes before plating and serving.

And there you have it, a seriously delicious but oh-so-easy to make fried rice that will honestly make you and your guests believe it was take out. Clean eating and gluten free, be sure you bookmark this recipe and if you made it, be sure you let us know what you though of it by leaving a comment and rating the recipe below!
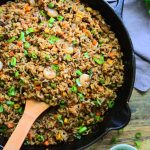
Restaurant-Style Shrimp Fried Rice
Ingredients
- 1 lb Shrimp raw, peeled, deveined
- ¼ tsp Himalayan salt
- ½ tsp ground black pepper
- 2 tbsp peanut oil
- 1 tbsp salted butter
- 1 tbsp fresh ginger grated
- 3 cloves garlic chopped
- 1 cup mixed vegetables diced carrots, green peas, corn
- 4 cups brown rice or any rice of your preference, cooked and cooled
- 1 tbsp fish sauce
- 1 tbsp tamari or soy sauce
- 1 tbsp rice vinegar
- 1 tsp Chili Garlic Sauce optional
- 1/2 tsp ground white pepper
- 2 large eggs beaten until frothy
- 1/4 cup Spring Onions chopped
Instructions
Prep
- Rice: Remove rice from fridge and let come to room temp if possible.If using freshly cooked rice, spread it onto a baking tray to allow as much steam and moisture to evaporate until your rice is cooled to room temperature.4 cups brown rice
- Shrimp: Clean your shrimp and ensure they are peeled and deveined (tails removed). Then season them with salt and pepper. Set aside.1 lb Shrimp, ¼ tsp Himalayan salt, ½ tsp ground black pepper
- Sauce: In a bowl, mix together your fish sauce, tamari, rice vinegar, white pepper & chili garlic. Set aside.1 tbsp fish sauce, 1 tbsp tamari, 1 tbsp rice vinegar, 1/2 tsp ground white pepper, 1 tsp Chili Garlic Sauce
- Mise en Place: This fried rice comes together quickly and on high heat so you need to be ready. Line up your ingredients to be used in this order: oil & butter • seasoned shrimp • ginger & garlic • vegetables • rice • sauce • beaten eggs • green onion
Cook
- Cook your Shrimp: To your skillet, add the oil and butter and set on med-high heat until the butter is melted, then add in your shrimp and cook until they are pink and no longer translucent. Once cooked, remove your shrimp from the skillet and set it aside, be sure to leave as much of the oil in the skillet as possible.2 tbsp peanut oil, 1 tbsp salted butter, 1 lb Shrimp
- Fry Vegetables: Add the ginger and garlic to the skillet and flash fry until it's fragrant. Your pan should be almost smoking. Add the mixed vegetables and toss and fry them for 1-2 minutes.1 tbsp fresh ginger, 3 cloves garlic, 1 cup mixed vegetables
- Fry Rice: Turn your heat to HIGH and add the rice and immediately toss to coat all grains in the garlic/ginger oil and mix the vegetables in. Fry for a minute or two, tossing frequently. Your pan will be smoking hot so be sure you keep everything moving around to avoid it from burning. If it does begin to burn, lower the heat.4 cups brown rice
- Add Sauce: Add the sauce made by mixing together your fish sauce, tamari, vinegar and white pepper, and immediately toss your rice in it, making sure all grains are coated in the seasoning and let it fry for an additional minute or two, while keeping the ingredients moving.1 tbsp fish sauce, 1 tbsp tamari, 1 tbsp rice vinegar, 1/2 tsp ground white pepper
- Add Egg: Lower the heat of the stove to med/med-high. Spread the rice out in the pan in an even layer and pour the beaten egg over all grains then immediately toss to coat all rice grains in the egg. Let fry an additional minute.2 large eggs
- Final Step: Take your pan off the heat and add in the green onion along with the cooked shrimp and toss to incorporate all ingredients together.1/4 cup Spring Onions, 1 lb Shrimp
- Finish and Serve: Top with additional spring onions and serve.
- Storage: If you have any leftovers, bring them to room temperature before putting into an airtight container and storing in the fridge for up to 5 days.
Notes
- The 4 cups of rice are measured once the rice has been fully cooked.
- Don't overdo it with the add ins, keep it to about one cup total and fry them for 1-2 minutes before adding the rice to ensure any added moisture is cooked off. If your veggies are frozen, fry and additional minute or two.
- For more delicate add ins like bean sprouts, add them last after the rice is done and removed from the heat.
- Keep your heat high, work quickly and ensure you keep the ingredients moving around the wok or skillet to prevent anything from burning and ensure you allow for 1-2 minutes of cook/fry time between each set of ingredient addition so that you can layer your flavors and not have your rice be bland or one note and so you can achieve the perfect texture to your rice.
