
Originating in Mexico, corn, also called maize became the main staple used by the indigenous Maya, Inca, and Aztecs, spanning back some 7000 years ago. Originally thought to be created by crossbreeding wild grasses, various types of corn (from white to blue to yellow) were hybridized and developed and soon the iconic plant migrated from Mexico and spread throughout the Americas. Chief among the most commonly made corn-based dishes are the famous corn tortillas which have become synonymous with what most of us think about when we think Mexican cooking.
Gluten free, paleo, vegan and vegetarian friendly, these clean eating corn tortillas use only three ingredients and are so simple to make (and yes, I know I do say that for almost every recipe, but it’s really true!) Let me show you how to make these warm, soft and addictively delicious tortillas…

Three ingredients:
- Masa Harina: I highly recommend using instant corn masa flour.
- Salt: You can use either a Pink Himalayan or a Sea Salt of your choosing.
- Water: You’ll want to use hot (not necessarily boiling) water as this allows your masa dough to faster absorb the water and results in a more pliable dough.
An optional 4th ingredient is to add about a tbsp of melted fat (lard, oil or even bacon grease) to this recipe along with the water. This helps to make your dough a bit more pliable and depending on the fat you use adds flavor to your tortillas.
That’s it. All you need now is some elbow grease and that stack of warm flexible tortillas is within reach!
So what exactly is masa harina aside from being the main ingredient of these tortillas? Simply put, it’s corn flour (not to be confused with corn starch or corn meal) and to make it, corn is soaked in calcium hydroxide (aka slaked lime), dried and then ground into a fine powder. I’ve made a post HERE explaining the process a bit more as well as why such a chemical sounding thing is “clean eating”.

So, back to making these little rounds of corn goodness, we’re going to mix the salt into the masa harina…

…And add half the water. Then we’ll mix the water in and using our hands break down any larger lumps…

…Before adding the rest of the water. This ensures an even and thorough distribution of water for the masa harina to absorb.
Technically speaking, I like to think of it as if I’m making a short crust pastry whereby I’m “cutting” the fat (water in this case) into the flour. But…can you dump all the water in at once and mix/knead it into a dough? Sure you can but then you also run the risk of adding too much water and over-saturating your dough and having to go back and adjust by adding in more masa harina. Either way, the choice is yours!

With all the water added, we’ll work our ingredients together into a dough that is similar to a sandy-textured playdough. You can at this point adjust your dough as needed by adding more water if it’s too crumbly, or more masa harina if it’s too wet and sticky.

The next step is to let your dough rest by setting it aside and covering it with a clean and damp cloth for 15-20 minutes. This is once again to allow the (hot) water to fully absorb into the ground up corn which results in a dough that is more workable. More to that, it results in the final tortilla being both soft and pliable instead of dry and crumbly.
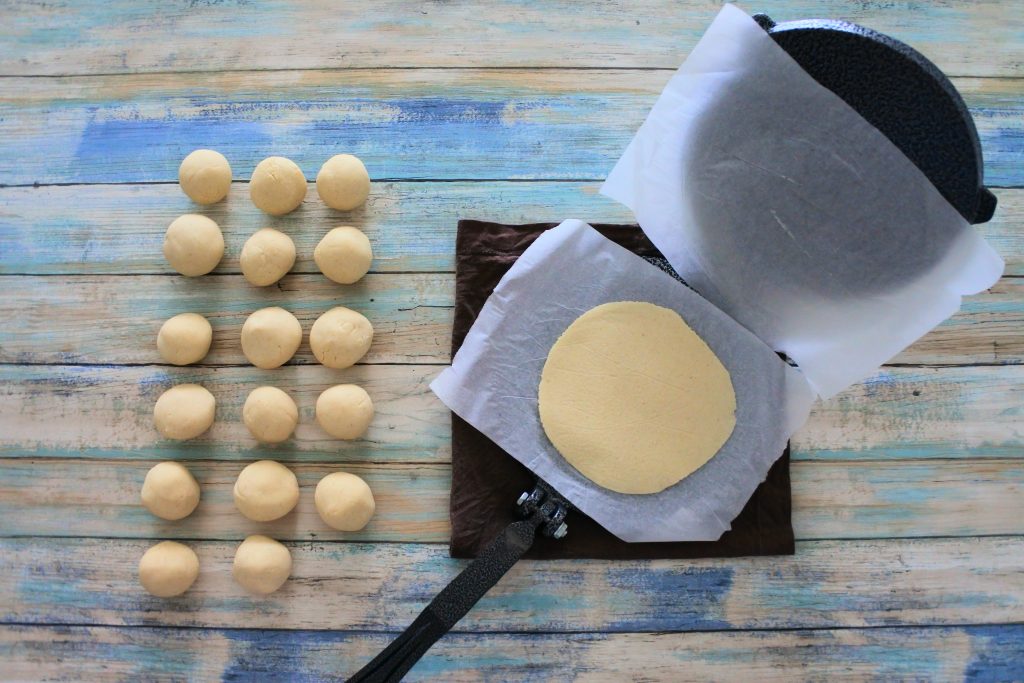
Once your dough has rested, divide them into 15-18 balls, (though do note that corn tortillas are better off on the smaller side. Since they do not contain any gluten, unlike flour tortillas, they are prone to breaking/tearing when they’re larger) that are about the size of a golf ball. As you work, I recommend keeping your dough balls covered with a damp cloth to keep them from drying out.
Press each ball into a flattened round or roll them out using a rolling pin. If using a tortilla press, I highly recommend using some parchment paper to press your rounds between as it makes pressing and transferring them so much easier.

Set each pressed out round into an ungreased pan that’s been heated to medium heat and cook for 1 minute on each side.
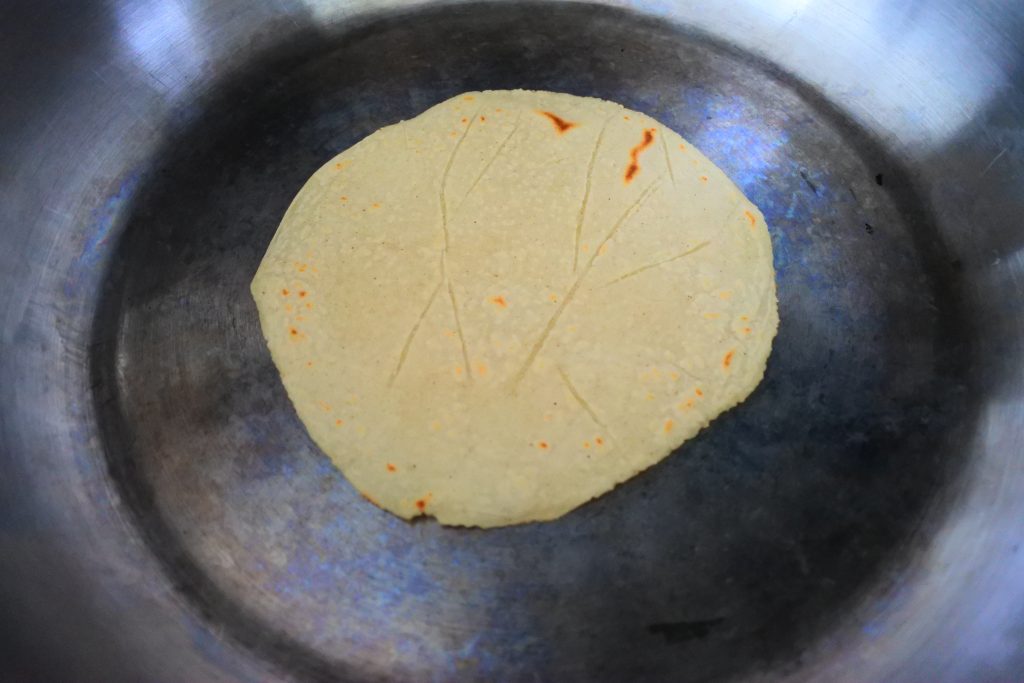
Once flipped, you should see some brown spots or char marks. If there are none, then after the minute is up, flip and continue cooking for a bit longer (but do not let it burn).
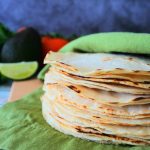
Wrap your cooked tortilla in a clean, dry kitchen towel and set on a plate (unwrapping and adding each cooked round as you go. A good trick is to cover your wrapped and growing stack with a bowl large enough to cover the stack. That way you can keep the heat which not only keeps your tortillas warm but also soft.

The end result is a heavenly stack of warm, soft, beautifully handmade corn tortillas with just a touch of charring around the edges. It’s the perfect vessel for your choice of toppings from meats to vegetables. Or you can go all out like I did with these Marinated Steak Tacos!
That’s it for yet another recipe. I hope you enjoy your tortillas as much as we do!
Don’t forget to tag and share your pics of your corn tortillas with us so we can all drool over them together! 🤤
Homemade Corn Tortillas
Equipment
- Tortilla Press
Ingredients
- 2 cups masa harina
- 1⅔ cups water (hot)
- 1 tsp Himalayan salt
Optional: 1 tbsp melted fat (lard, bacon grease, or oil)
Instructions
- Combine the masa harina and salt together.
- Mix in half the water. Once absorbed, add in the remaining half (along with the melted fat if using) and knead until a soft dough forms. The dough should be the consistency of a sandy play dough (not dry and crumbly but not wet and sticky).
- Set the dough aside and cover with a damp kitchen towel to rest for 20 minutes.
- Divide the dough into 15-18 small balls and flatten each round using the tortilla press. Alternatively, you can use a rolling pin
- Warm a skillet on med-high heat until a drop of water sizzles when added, reduce the heat to med-low and add one of your flattened rounds and cook for 1 minute on each side until light brown spots appear. Note: do not grease or oil your skillet, there is no need for it. Once one side cooks it should easily release on it's own and slide around the pan.
- Continue working your way through your dough balls until you have a stack of cooked tortillas.
- Serve immediately for best results and store any leftovers wrapped in a clean kitchen towel or paper towel in an airtight container or Ziploc bag for up to four days. To reheat, wrap your tortillas in a damp paper towel and microwave in 10-15 second increments until warmed and flexible.
Notes
- Letting the dough rest greatly improves the texture of your tortillas as it allows the water to fully be absorbed. Though you can skip this step, I highly recommend doing it so that your tortillas are soft and flexible vs dry and crumbly.
- Be sure to place your dough balls between two sheets of parchment paper or plastic to roll them out or press them. It will the rounds much easier to work with.
- Once you have cooked a tortilla, set it on a plate and fold a clean kitchen towel over and under it and cover your tortillas with a bowl. This creates a warm dome that will keep your tortillas soft and warm while you cook the others. Continue adding tortillas to your wrapped stack and covering it back as you go.
- You can press all rounds out in advance or press them as you go (ie: while one cooks you press the other round. However you do it, be sure to keep them covered with a damp cloth to keep the dough from drying out.
- In the event that your tortilla sticks to the pan or burns, try lowering the heat. Another option if you're *not* using a Teflon coated pan is to run the bottom of the pan under your kitchen tap to cool it off quickly between every couple tortillas and bring it back up to heat since some pans tend to not retain heat evenly but instead keeps getting hotter which can cause your tortillas to stick and burn.
