Disclosure: This post may contain affiliate links.

This chocolate treat is the epitome of indulgent decadence; with a cake like outer edge, a softer mousse-like inner edge, and a thick, rich, chocolaty core that slowly oozes out once split.
Just the name says it all: Molten. Chocolate. Cake.
This dessert’s focal point is its deep, rich chocolate flavor. Be warned though, this is not a cloyingly sweet dessert. Made using dark chocolate and minimal sugar, the chocolate flavor is intense. But even if you’re not a dark chocolate fan fear not because you can easily sweeten the deal, so to speak, by topping your cakes with icing sugar, fresh fruit (I highly recommend strawberries or raspberries!) and a dollop of sweetened whipped cream.

🤤 Let me Tell You Why You’ll Love, Love, Love This Recipe:
- This recipe is clean eating, gluten free and so so easy to make.
- It uses minimal ingredients – just 7 plus finishing touches!
- You can make it in just under twenty minutes.
- It doesn’t require any special skills or equipment – just mix-pour-bake.
- You can make and pour the batter up to two days in advance before baking, making it a great make ahead dessert.
- You can enjoy them as is or dress them up with toppings like fresh cream or fresh fruit.
- While these cakes are best enjoyed right away, if you happen to have leftovers, they are delicious chilled as well even though they won’t have that molten texture.
- CHOCOLATE! 🍫🍫🍫
Here’s What You’ll Need To Make This Chocolate Decadence:
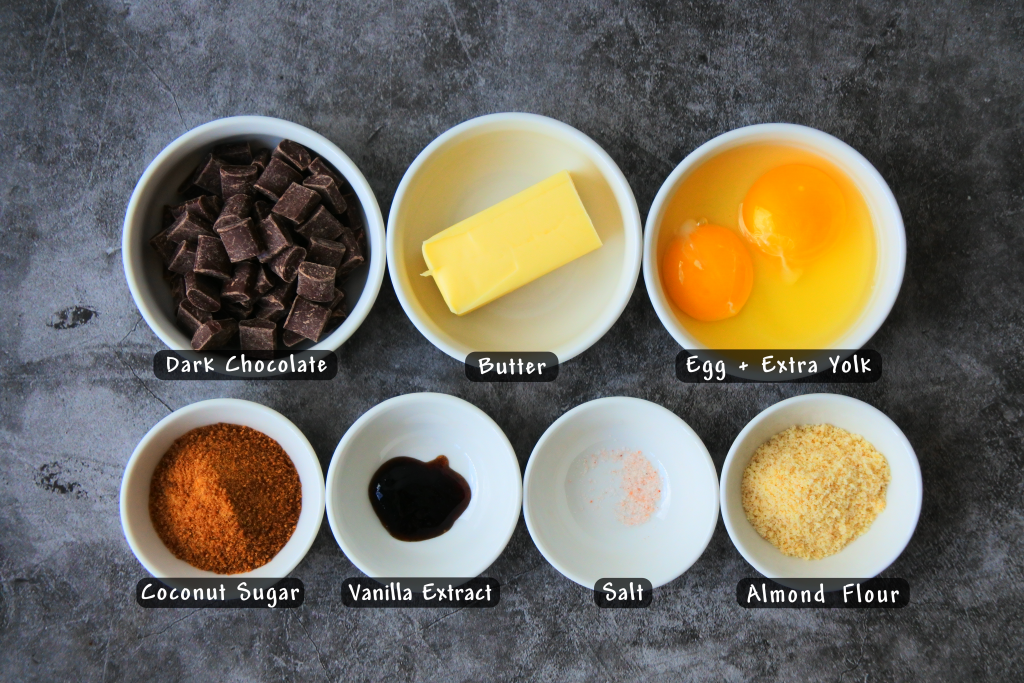
- Dark Chocolate: You’ll want to ensure you’re using dark chocolate – at least 67 % if not more. Do not use milk chocolate for this recipe, it will not bake or set right.
- Butter: I’m using salted butter but you can use unsalted if preferred.
- Eggs: I’m using US standard eggs, we’ll need one egg and an extra egg yolk for this recipe.
- Coconut Sugar: A low GI sugar with great caramel flavor, we’ll be using just small amount for our recipe. If you prefer you can use finely blended raw cane sugar, you won’t get the caramel undertones but your molten chocolate cake will slightly sweeter.
- Vanilla Extract: A small touch of vanilla paste or extract enhances our chocolate flavor.
- Salt: We want to use just a tiny touch of salt, especially if you’re using salted butter. Salt is a great flavor enhancer but a little goes a long way in this recipe so less is more.
- Almond Flour: A small touch of almond flour will help give our cakes some body and help the set to be just right. Opt to use a finely blended blanched almond flour for the best results.
Twenty-Minutes to Molten Chocolate Cakes…Ready, Set, GO!
The first thing you’ll want to do is get your oven preheated to 425ºF degrees for a fan forced/convection oven or 450ºF for a conventional oven.
Next, you’ll want to butter the insides of two 6 or 8oz ramekins and lightly dust them with a light layer of cocoa powder, being sure to knock out any excess. Don’t skip this step as our molten chocolate cakes will be somewhat delicate so you want to ensure they unmold with no issues.
If you don’t have ramekins, you can also use greased and cocoa powder dusted muffin tins, but depending on their size you will need to adjust the bake times of your cakes.

Now we’ll get started on the batter. To make your batter we’ll melt our butter and chocolate together. You can do this over a bain-marie or in the microwave on short 30 second blasts, stirring between each seconds until your chocolate and butter are both fully melted.
Be sure you mix them together until the butter and chocolate are FULLY incorporated. If not, you’re going to risk the butter separating from the batter when it bakes. Set your chocolate and butter aside to cool a bit while we work on the next part.

In another bowl, whisk the egg and extra egg yolk together until they’re frothy, then whisk in the coconut sugar, almond flour, salt, and vanilla.
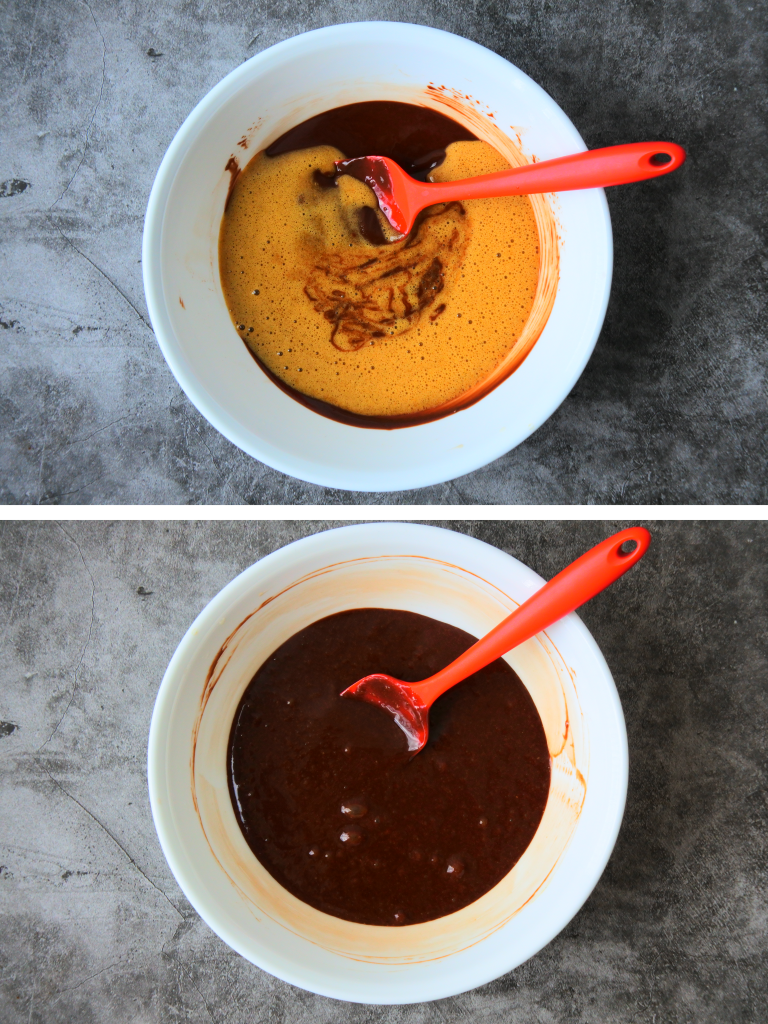
Add your egg mixture to your butter/chocolate mixture and vigorously stir to combine everything, as you mix it you’ll notice the it will begin to thicken. You want it to have the texture of brownie batter – thick but still pourable.

Divide and pour your batter into your greased and cocoa powder-dusted ramekins.
I Want to Bake them Later:
If you want to bake your molten cakes later on, pour your batter into your ramekins, cover the tops with foil and place them into the fridge for as long as two days. As the batter chills, the butter and chocolate will harden so before baking, take them out the fridge and allow them to rest at room temperature for 1-2 hours and then bake as directed.👇👇👇
I Want to Bake them Right Away:
Place your batter-filled ramekins onto a tray and into the preheated oven for 10-12 minutes.
For me 10-minutes is the perfect amount of time. The edges are set and it unmolds like a dream while allowing the middle to still have a thick and rich flow of chocolate decadence.
I recommend you take a peek at them around the 8-minute mark to see how they’re setting up. We’re looking for the edges to begin pulling away from the sides of the ramekin and have a set to them. The middle will be uncooked and sunken in, this is normal since we want that molten center.
Are Molten Cakes Safe to Eat??
Rest assured that they are! Even though the middle of these cakes are unset, it’s not raw or uncooked batter. Due to the combination of ingredients we’ve used and the temperature we’ve baked our cakes at the molten middle comes up to about 160ºF. For reference, eggs are safe to ingest at 145ºF.
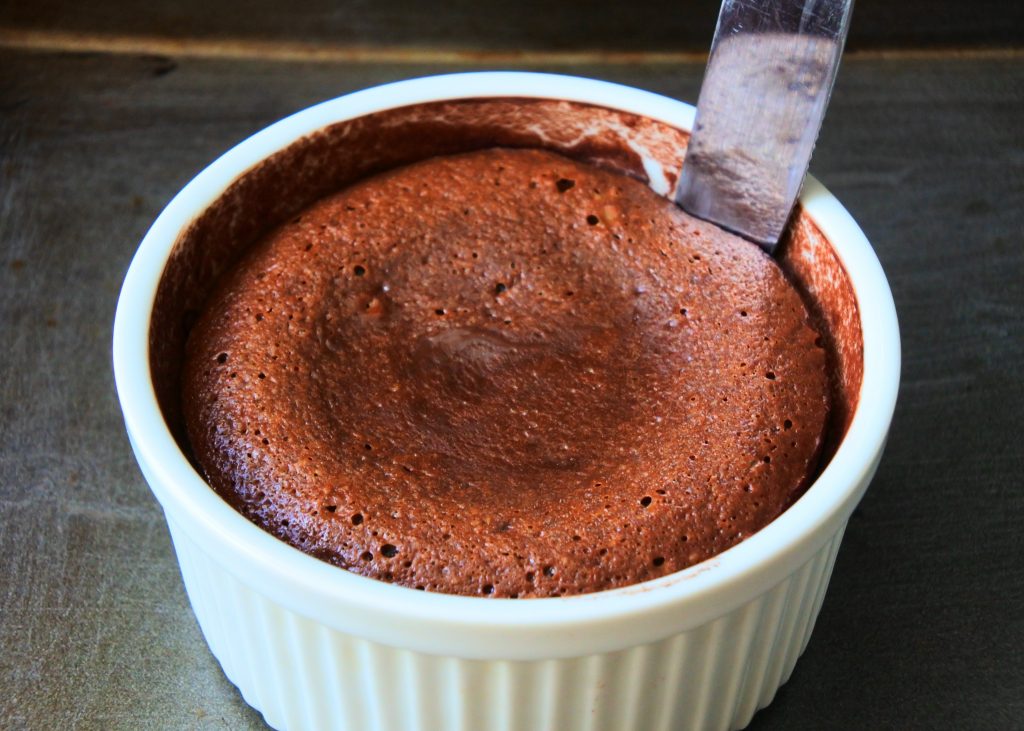
Once your cake’s edges are set, remove them from the oven and let them rest for just a minute so that the edges can firm up enough for unmolding. Then, run a knife around the edge, being sure to go all the way down and around.

Place a plate over the ramekin and flip it so that your cake can unmold itself. It should release without issue and you can then lift the ramekin to reveal your molten chocolate cake. 🤤

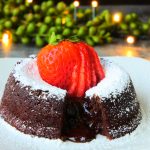
Your cakes are delicious all on their own but I like to serve mine with a snowy dusting of powdered sugar and I absolutely love pairing it with fresh strawberries since the flavors work together and complement each other so well…and also, let’s be real, it looks so pretty!

All that’s left to do is to make that iconic first cut and split your cake to watch the molten middle slowly ooze out. It’s so satisfying to see and even more so to devour.
As a side note, in making several batches to test and perfect this recipe a few baked cakes ended up in the fridge and I can confirm first hand that they are also phenomenal when they are chilled. They won’t have the molten core anymore but the texture and consistency as well as the flavor is phenomenal. It’s like the densest richest chocolate cake meets chocolate mousse….you know just in case you were wondering 😉
And there you have it, it’s so easy to make these cakes but they are so phenomenal in taste and texture. We really hope you give these a try and if you do, don’t forget to let us know how they turned out in the comments below 🥰
Molten Chocolate Cakes for Two
Ingredients
For Ramekins: ½ tsp butter and 1 tsp unsweetened cocoa powder.
- 4 tbsp salted butter
- 3 oz dark chocolate chips Opt to use a chocolate that has at least 67% cocoa.
- 1 large egg plus extra egg yolk
- 2 tbsp organic coconut sugar
- ½ tsp vanilla extract
- 1 tbsp blanched almond flour
- pinch Himalayan salt
For Topping: icing powder, fresh fruit and/or freshly whipped cream or coconut cream.
Instructions
- Prep: Preheat the oven to 425°F for fan forced, 450°F for conventional ovens, and grease two 6 or 8 oz ramekins with butter and dust with cocoa powder.
- Make the Batter: Melt butter and chocolate in a microwave safe bowl, stirring every 20-30 sec until melted. Stir to fully combine.
- In another bowl, beat together the egg and extra yolk, coconut sugar, vanilla, and salt together until thick and frothy.
- Mix in the chocolate and almond flour to the egg mixture and vigorously stir until it thickens into almost a brownie batter consistency.
- Bake and Unmold: Divide and pour into two ramekins and bake for 10-12 min in the oven. You want the edges to pull away from the sides and be set but the middles are still jiggly with a set skin over them.Let it rest for a minute then run a knife around the edge before you cover with a plate and flip to turn them out. They should drop and unmold easily.
- Garnish and Serve: Dust the tops of your cakes with icing sugar and fresh fruit such as strawberries or raspberries and/or some freshly whipped heavy or coconut cream.Enjoy!
- Bonus: These cakes can be enjoyed chilled as well! Once baked, allow them to come to room temperature before putting in the fridge for a few hours to chill. They will no longer be molten but will instead have a rich texture that falls somewhere between a rich cake and dense mousse.
Notes
- Use a dark chocolate that has at least 67% cocoa in it. Do not use milk chocolate, it will not allow your cakes to bake and set as it needs to because of the milk and sugar content in it.
- Don't have ramekins? You can also use a muffin tin. Just butter and dust with cocoa power and adjust your bake times based on their size.
